Room nodes and speaker placement

With the available free time I decided to tackle my room nodes issue in the hope of improving both Music (stereo) and Movies (overall sound quality).

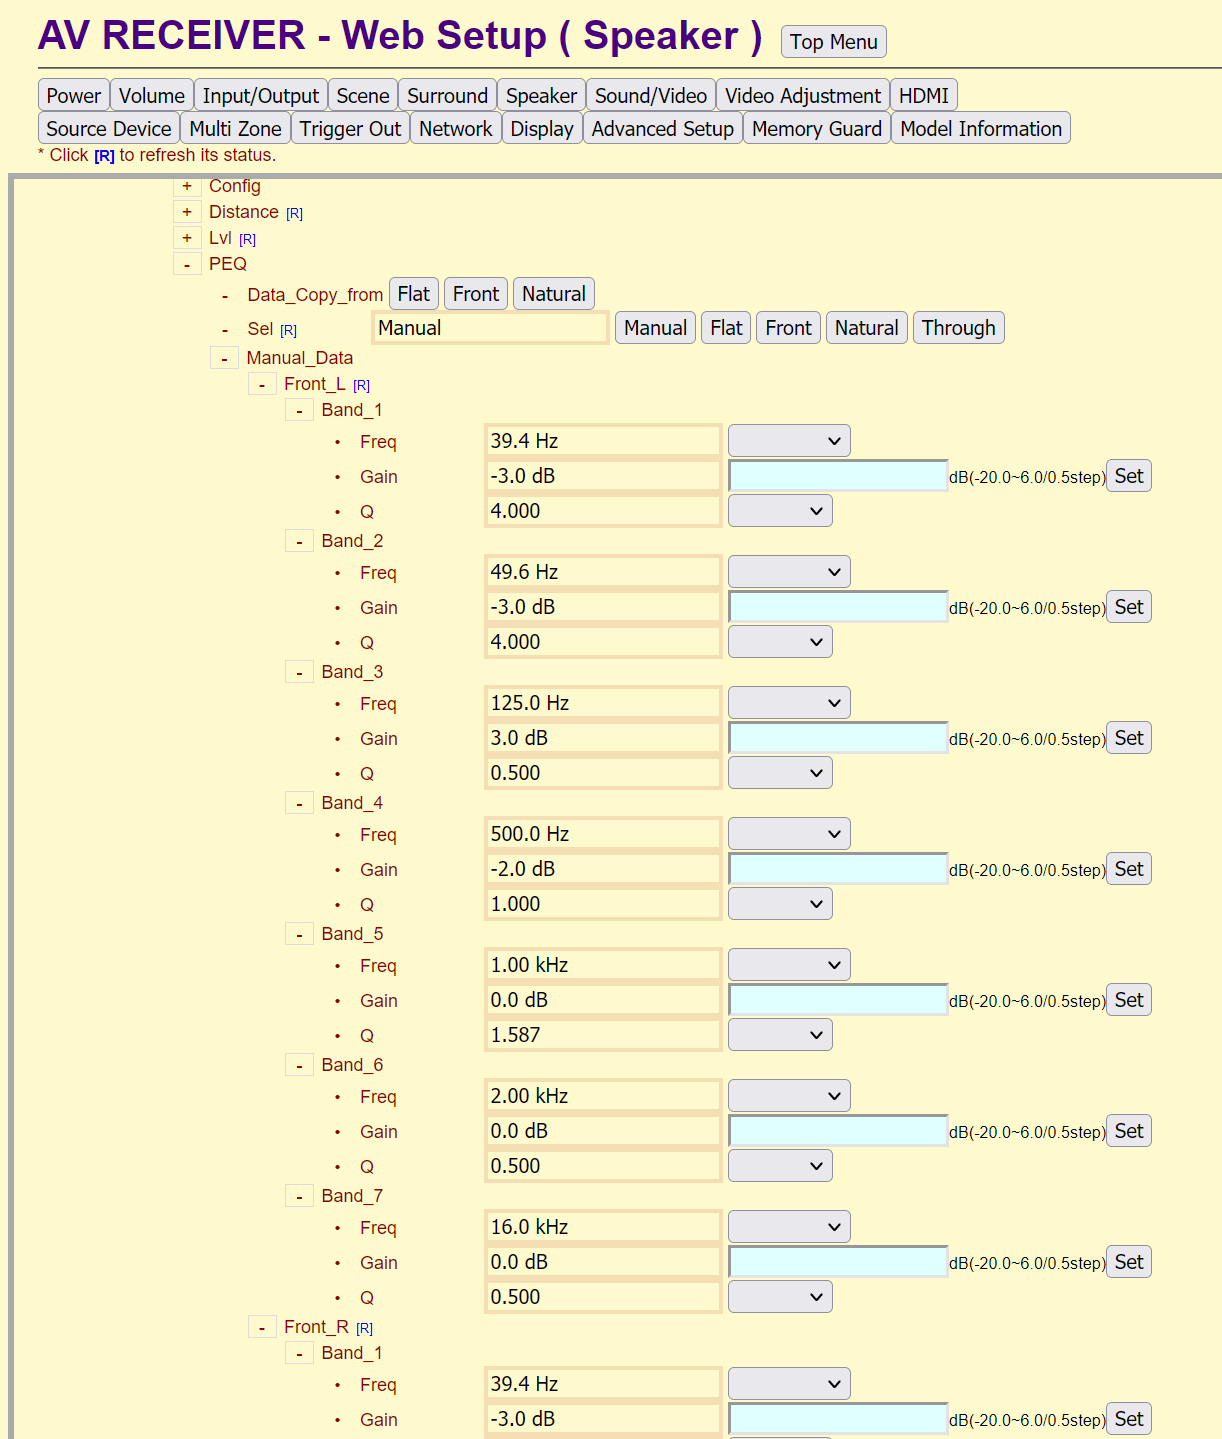
My initial effort was around improving the SQ of the front spkr esp on the bass room nodes thru PEQ.

I downloaded Roon and played with the yammy PEQ as well. The results are hits and misses. After 1.5 week of tweaking I decided to do additional reading.

I then decided to go back to fundamentals the room and spkr placement. Get this right b4 trying any PEQ.

I needed some tools to help,… I found a free software for measuring the freq response

I’m surprised at how extensive this software is.

This also means I needed to teardown the room and take a barebone measure b4 experimenting on various placement.


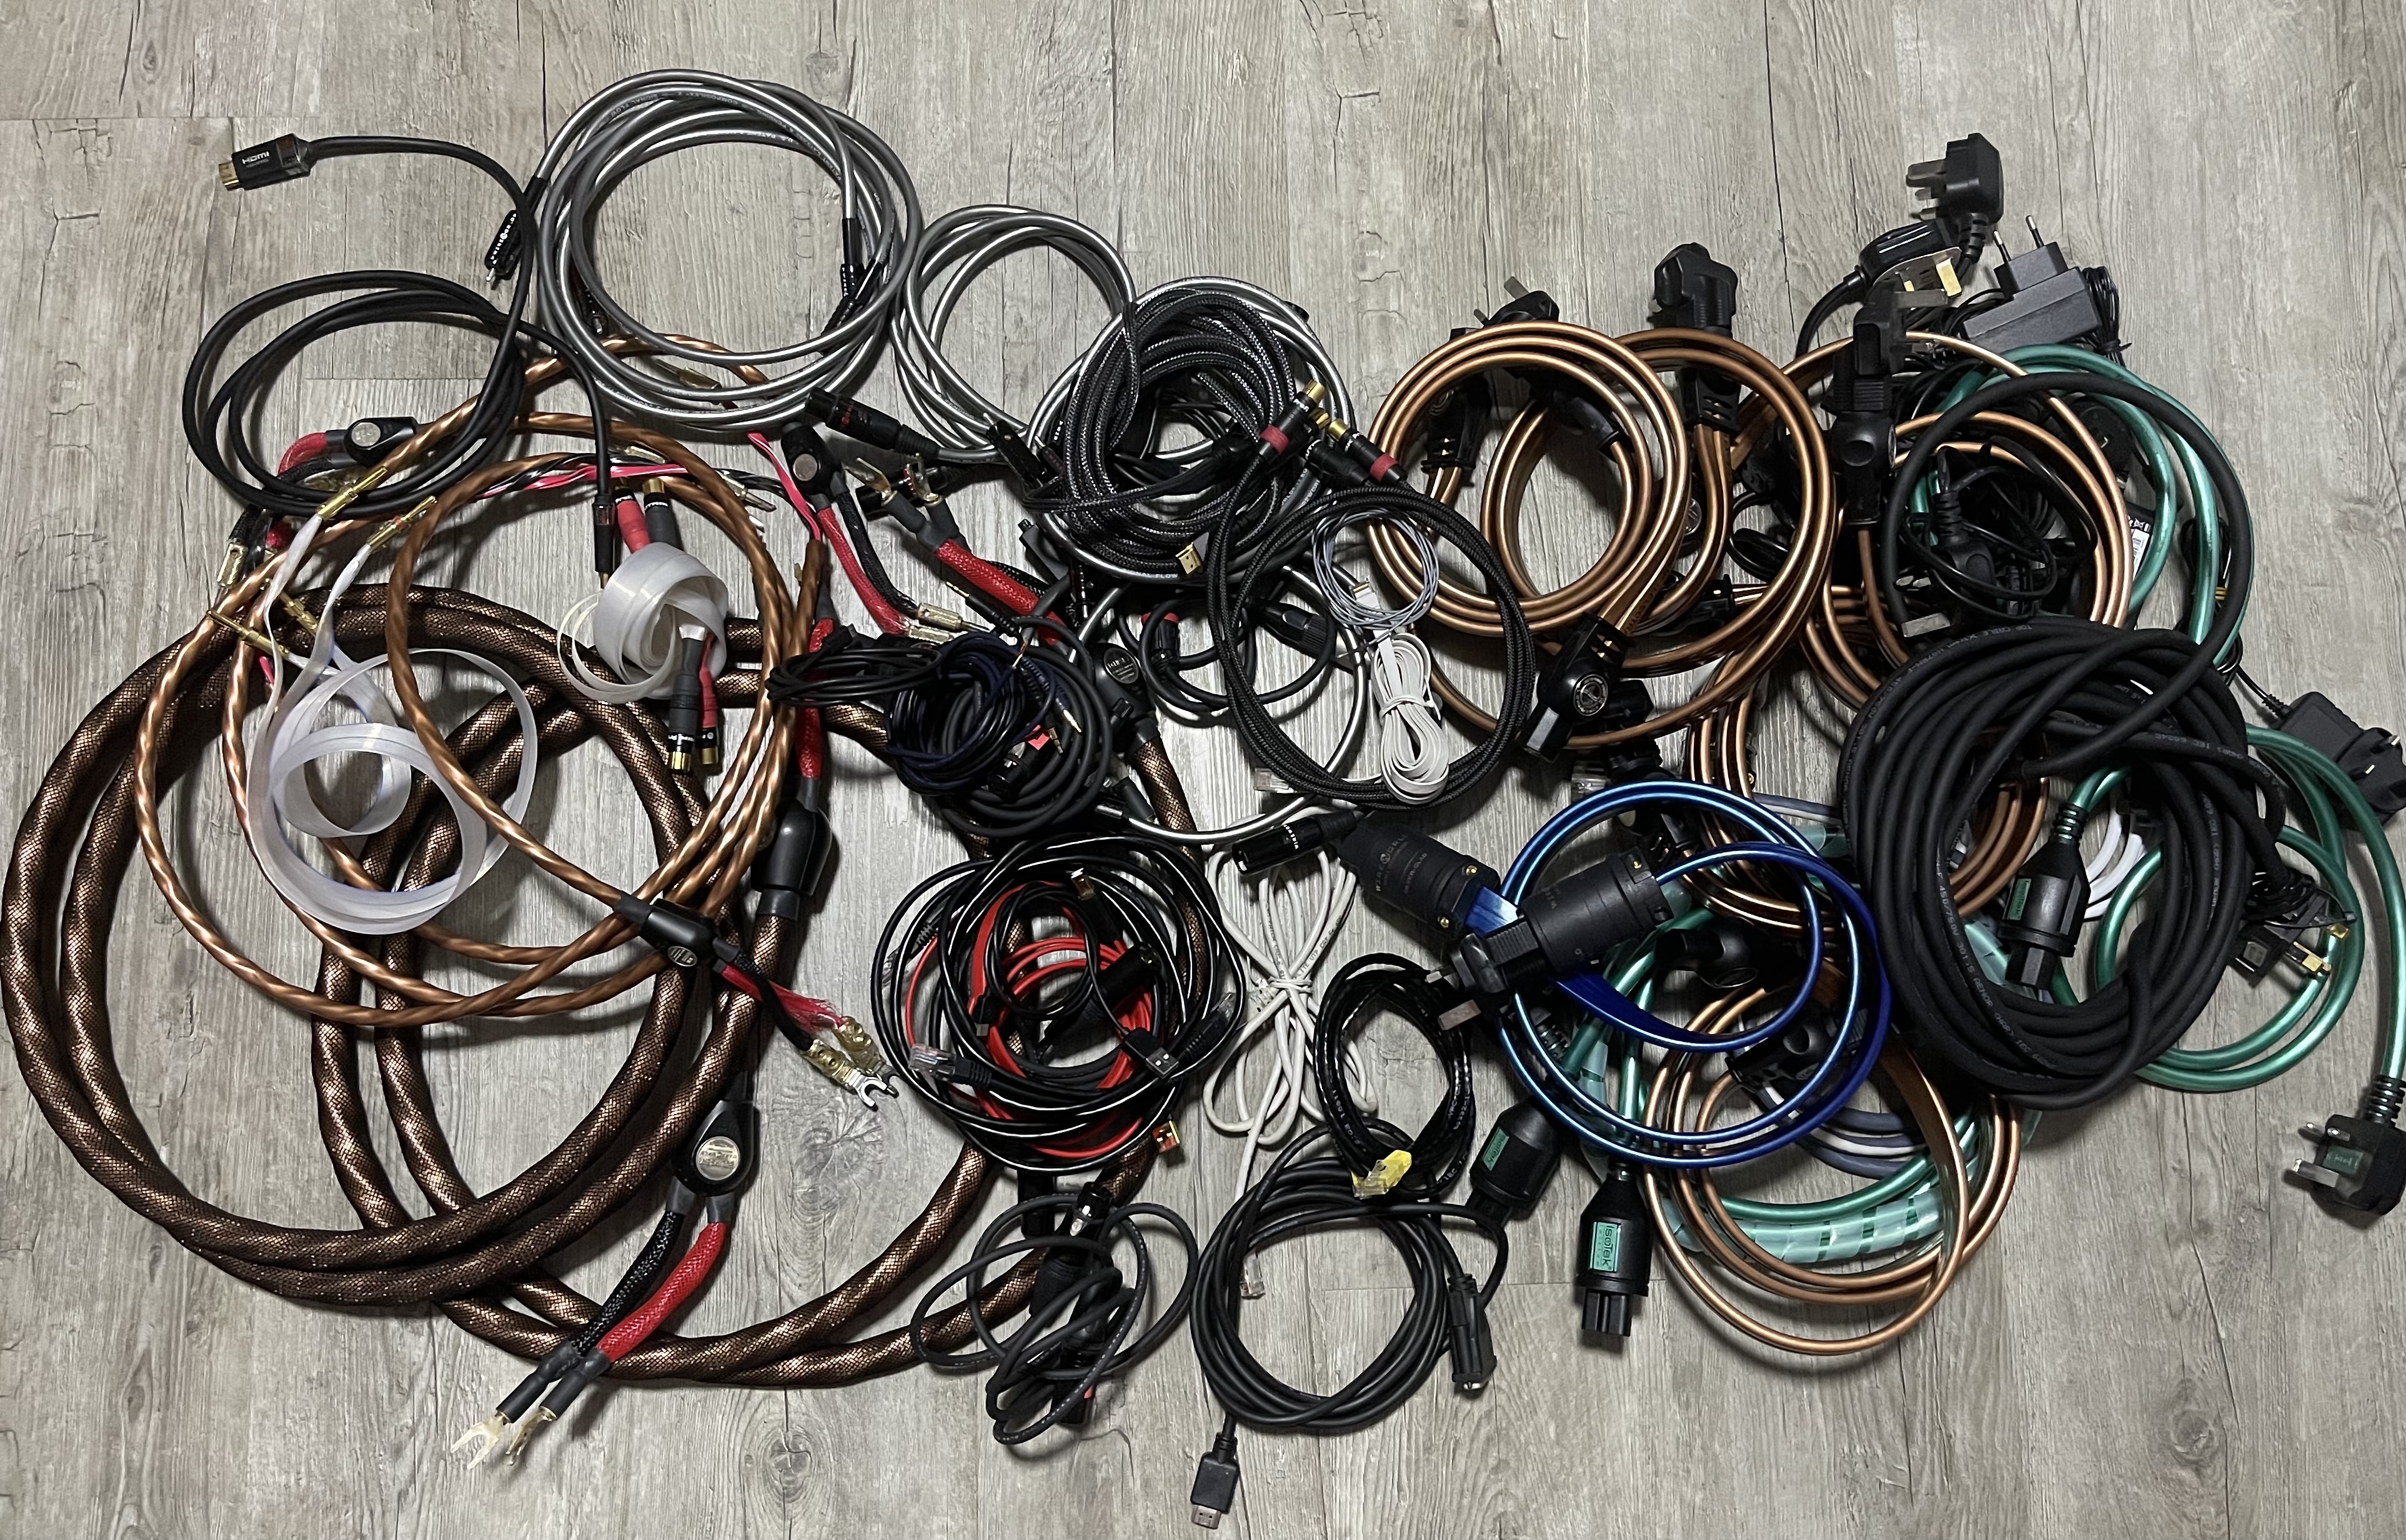
Crazy amt of cables!!

Critical tools are a SPL meter and laser meter (tape works too but very tedious).

Once room is clear to barebone, I took a reference plot.
After which I went thru several iterations of positions before settling for the “final” location.

The results are quite good, probably best sounding to date…

Below are the plots;


SPL response of final vs baseline. As can be seen the nasty spike at 43Hz for 1st room node is effectively tamed. Overall the response is flatter too.


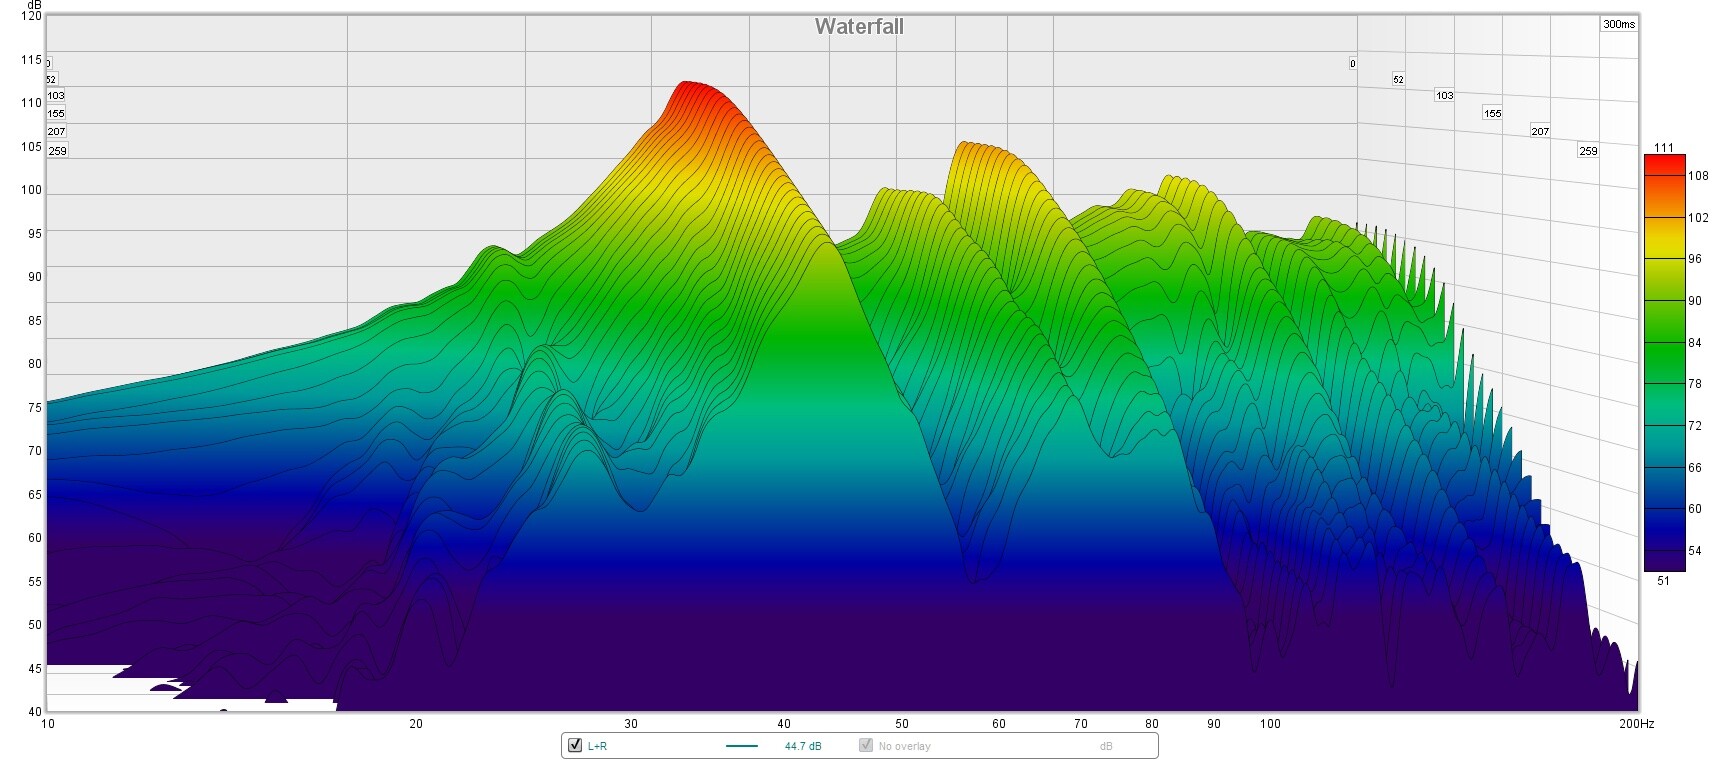
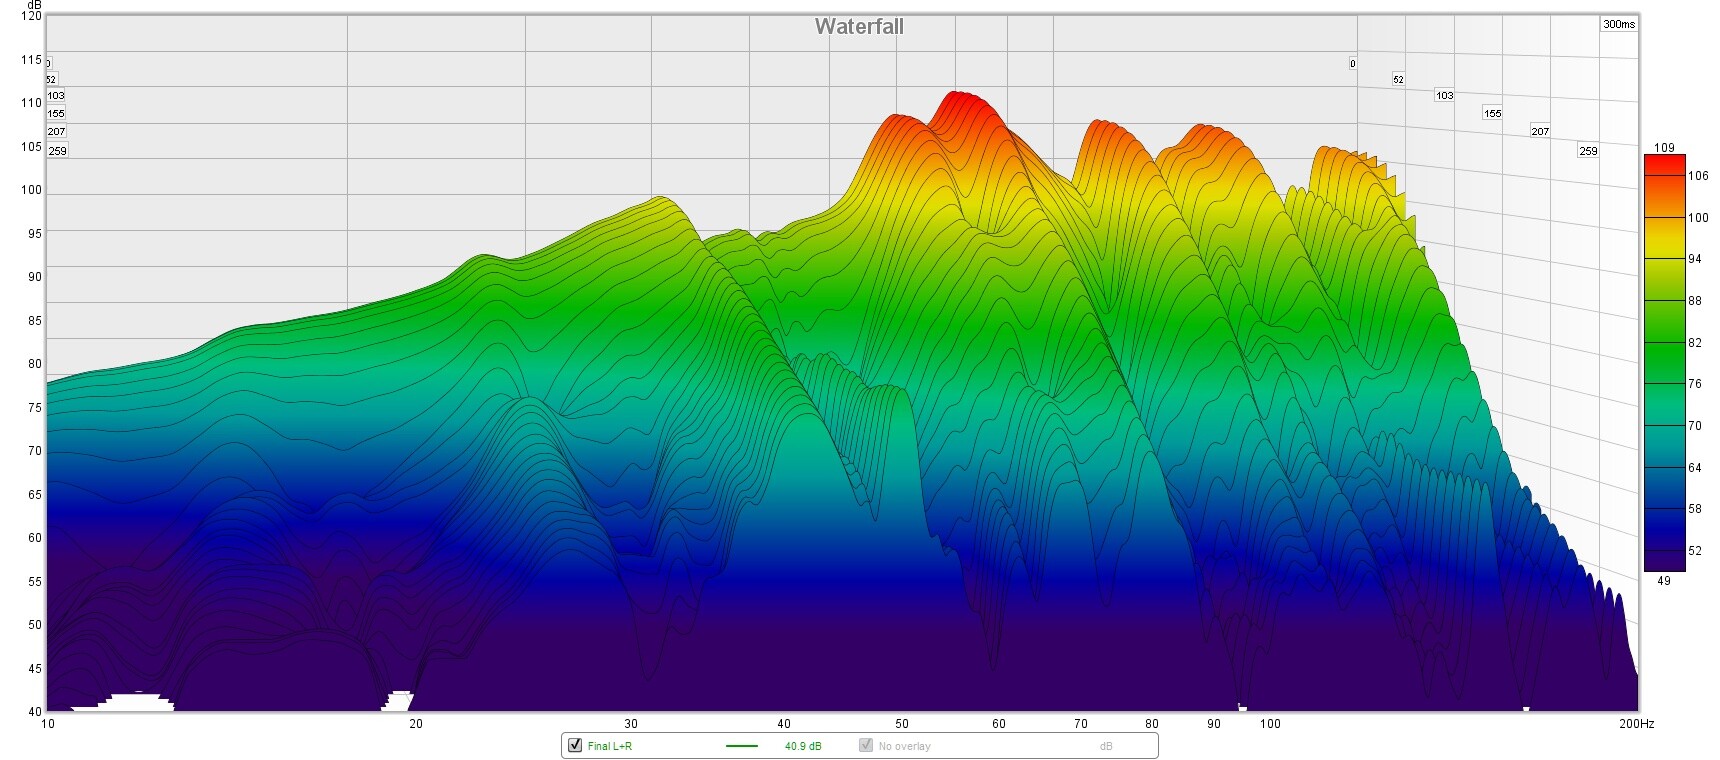
The waterfall plot also shows better decay (final plot are with room treatments added).

The whole experience took 2 full days - 9am - 10pm both days… back breaking to say the least.

To get the initial spkr placement, I start with the magic ratio of 38%. Due to room size, i had to keep the spkrs close to the side walls (else blocking the screen). From there I experiment by shifting it back and forth.

Saw a YT vid that suggested for small rooms, to push the front spkr all the way against the wall (ie ala wall mounted and apply room treatments on both side. Sounds horrible!

Movie wise, Center spkr sits on top the sub and pushed back near to the front wall (behind the screen); No change for the side and height spkrs. As my past YPAO calibration experiences did not yield satisfactory results I opted to manually key in the spkr distances (laser meter) and set the levels with the SPL meter.

I might do one YPAO calibration just for comparison,… but 1st time for R&R and enjoy the fruits of my labor.

Strangely with this setup now I find myself wishing for more bass at times. Nothing is perfect :grimacing:

Anyone who has done similar experiments, feel free to share your experiences.

Is your room 4m x 4m square?

I do have 43Hz room mode from my 4m square room.

I dealt with it through a mixture of steps:
a. using REW simulation to identify initial speaker positions, then refine from there.
b. added bass traps (2x MOAB) at the front corners
c. use shelves/desk/chair with irregular mix of items in the shelves for diffusion
d. use REW measurement to identify the problem area
e. after quite a lot of experimentation, the more EQ being done tend to make the sound a little “lifeless”, I finally settle down to just target the 43Hz room mode & 500Hz honkiness.

AVR

  1. ran YPAO normally
  2. login to Yammy AVR setup webpage (http://W.X.Y.Z/Setup/) where W.X.Y.X is the IP of your AVR
  3. goto “Speaker” tab
  4. identify which pattern group is being used (either 1 or 2)
  5. goto the active pattern group, under “Manual” PEQ
  6. I data copied “Flat” to “Manual” so that whatever YPAO adjusted from the frequency & phase measurement is copied over
  7. I cleared all the frequency gain adjustments (i.e. set to 0).
  8. I manually input my desired PEQ (steeper cut around 43Hz to deal with the room mode, mild wider bandwidth cut @ 500Hz to deal with the honkiness)
  • for the 43Hz cut, since the PEQ frequency cannot be adjusted, I needed to use two filters side by side to achieve what I need.

=> very happy with the results. great clarity, nice surround effects, without overbearing bass. watching concert is really nice.


Stereo
Since my main stereo player is foobar2000, i use MathAudio EQ DSP to execute a -5dB steep narrowband cut @ 43Hz.

=> super happy with the results.

Hope my sharing helps you in your tweaking journey. Enjoy the journey!!

My room dimensions = 4(L) x 3(W) x 2.56(H)
One half of the back wall is full height window.
Door is at the side wall adjacent to the back wall.

I had quite a severe node issue in my last config where the front L+R speakers were closer to the Main wall (as per baseline plot). Moving them out 1/3 along the 4m length did the trick in taming the 1st node.

Comparing to the theorectical room nodes, I was having issues mainly on the 43Hz axial mode and 65Hz+78Hz tangent modes.

I used a substantial qty of of treatments, 4 corner traps, 2 pair of stacked MOAB+Adsorber and 2 medium adsorbers for 1st point reflection and 3 at back wall - I had all these adsorbers from past journeys, so just dumping them all in.

I’m surprised you can still put chairs, desks and shelves in the room. I could hardly allocate space for any other furniture after squeezing in 2 recliners and a small chairs(impermanent).

It so happen we both have yammy AVR!

After some housekeeping in the last two days, I managed to put some time in running YPAO as well. I did tweak the manual PEQ before this last reconfiguration. I find it is a hit and miss…
This time round, I just do 1 listening position + height & angle.
The 1st attempt the distance is quite accurate however, I eventually made minor adjustment to the front + center. The 2nd attempt, the front speaker was way off… manual measurement is just 2m while the system reported 3.5m! I was too lazy to run again, so I manually enter the values while keeping the PEQ.

Similarly, I copied the FLAT to Manual and run A/B listening test on the front stereo channels.
I do this by engaging and disengaging the DIRECT function - ie engaged = PEQ DSP OFF, disengaged = PEQ DSP ON.

PEQ ON
The high and mids are very close, can’t really hear any difference,… just a tinge emphasis
The low is deeper, seems to be a bump up but without going into boominess.

Surprisingly, this is the 1st time I preferred the DSP on vs off. Past experiences in these auto-calibrations I have always ended up turning them off as while room nodes are addresses, it robs the mid and high of warmth and substance (ie sounding thin and dull)

I’m quite happy with the results for both MUSIC and MOVIES.

1 Like

Yaa, exactly as you’ve experienced, for manual adjustment, using just 1 listening position for YPAO works best. I only measure MLP.

The multi-seat measurement is not that great - I speculate that the multi-seat YPAO probably does some averaging of the measurements, so the results ain’t so good for MLP.

Nice analysis and work ricky :slight_smile: Enjoyed reading your post.

Regarding the FINAL vs BASELINE graph, can u share what do they represent each and their conditions as currently their definition is not so clear? :slight_smile:

Your L+R speakers for FINAL, seem to start rolling off below 70hz and drops quite a fair bit. As u don’t use subs for music, doesn’t that give you insufficient/ very weak bass for music that has bass?

For HT, can’t really tell yet as not much info. If you can measure the FRs for (i) subs alone; (i) subs crossed with front speakers; both with and without YPAO, will be great point to start with.

It’s not really that complicated actually…

Basically I took 2 measurements;

BASELINE - combined L+R speaker response

  • in “default” location (~ 0.5m from side & backwalls)
  • after disconnecting all equipment & moved to the back side wall (except stereo)
  • removed all room treatment panels (except the corner traps - too bulky to put elsewhere)

FINAL - combined L+R response at “final” location

  • played with the speaker placement, moving them further into the room (lessen base reinforcement) and to side (as not to block the 120" screen).
  • once I get a good stereo imaging and least room node reverberation
  • reinstall room treatment adsorber panels (bass traps on front wall, corner traps back wall and absorber at 1st reflection on side wall).

So basically the comparison of before (baseline - “bare” room and reference position) vs after (optimized - best placement with room treatment)

The difference btw Before and After is undoubtly discernible - the room nodes presence on several tracks is still detectable but for some that were a problem before are no longer the case now. Surprisingly there is unexpected improvements to the imagingand soundstage too. Not sure if that’s because the offending bass had previously veiled it or the final position created a better focus.

Despite what is shown on the chart, the bass sounds quite solid! I did not feel any “lack” of it from the music test tracks. Some of the test tracks are from;
Poem Of Chinese Drum
Billie Eilish - ilomilo
Hotel California - Hell Freezes Over
Sade - Smooth Operator

The freq response I read is just a basic view while the waterfall is of bigger significance. The SPL response shows the SPL at a single point in time while the waterfall dictates how quickly the reverberations dissipated. Thus even if you get a nice flat FR, if the sound takes a long time to die out, you will be hearing reverberations that spoils the whole experience.

Given a choice, it is better to have a good waterfall response than say a nice flat FR. Of course ideally, we should aim for both…

In my process, I manage to get an acceptable FR given existing constraints and the room treatments did address the reverberation decays acceptably well.

My approach is quite simple - I start by asking

  • Do I like what I am hearing?
  • Do I feel there is more that I am missing?

If I’m happy then Stop! Just enjoy it.
If I feel there’s something wrong or missing, then I will try to find out what & why. To do that, I will turn to science - ie researching the theory/physics and confirming the assumptions via measurements.

So in this particular case, after running the YPAO calibration, I only listen by ear the comparison of ON/OFF - there is clear improvements (to my taste). As such, I did not bother to make any further measurements - moreover, given the new layout, there wasn’t there really isn’t much of a choice on where to place the sub practicality wise. ie making more measurements is just too much efforts - will save and invest the energy in the next upgrade.

It bears repeating. speaker placement matters…fix it and you don’t need to spend more on speakers.

3 Likes

Good video. Thanks for sharing. I think my current ATMOS placement is the same issue he has mentioned. I shifted my atmos placement to dolby specs (aligned to top of mains) and it didn’t sound as good as when the atmos was placed more narrowly.

Yes. This is often the problem with following the Dolby specs. Remember when I told you when you visited my place a long time ago that Dolby stated Almos modules to be located slightly above the ear level for my Dolby Atmos enabled speakers, it didn’t turn out to be the case. Instead, one should place the speaker Modules way beyond the halfway mark of the height of the ceiling to get the reflection of sound to work as intended. Since then, I have used Dolby white papers as a form of casual reference and not the de facto standards in home cinema. Besides I have also mentioned that Dolby being an American company does not always factor in every possible case scenario like our HDB flat with a ceiling hight way higher than their typical basement. We just need to know he fundamentals and adept according to our room size to get things to sand right.

Dolby Atmos: In-Ceiling vs Height Speaker! Which is better for your setup?

Thanks for this @desray.

I do feel that height placements are excellent for atmos speakers and it gives very good effect when there are atmospheric sounds from afar or tall objects. Something ceiling placement can’t give.

But for scenes with footsteps above head and rain drops, i feel that having in ceiling atmos speakers can achieve the intended effects better.

How’s others experiences on comparing these 2 placements for different atmos scenes?

The youtuber seemed to generalise overly without considering this 2 type of scenes? It also lacked the consideration on the depth of the room.

1 Like

Agreed with you 100%…I would say TechnoDad’s remarks is a bit bias in his interpretation with what is the best Dolby Atmos setup for “music”…why I say so? Because he is a music producer and DJ by profession. From a music POV, height setup will be ideal, this is akin to Auto 3D speaker setup layout that works best for music, which explains why most of the Auro 3D titles focused on music and live concert.

For Dolby Atmos mixed in movies, l agreed with what you said, while the ceiling speakers, be it in-ceiling or on-ceiling can be more narrowed and centric focused, you MLP don’t move, meaning you are sitting at your MLP and not moving around. The “sweet spot”, if need to be wider will very much depends on the ceiling speaker characteristics - e.g. get the driver and tweeter in one concentric arrangement - like a coaxial design will certainly helped to “expand” the sound even wider to cover the MLP and more.

The purpose of that video from TechnoDad is more of one’s opinion and looking from “his angle” - i.e. from a music content creator POV.

1 Like

Recommended angles for your Dolby Atmos ceiling speakers

1 Like

Thanks for sharing this video @desray. I wasn’t aware they released another atmos placement video besides the 1st one they released some time back.

This is V good guide to follow.

Confirms my findings that i experienced in my own den, my overhead sound is smeared into my bed layer because of placement.

Aligning my front pair of overheads to my front mains might be a big mistake i made. The overhead sound was not as good as placing it narrower.

Also, have to shift my atmos speakers soon to achieve that 55 degrees angle.

Atmos effects is something unique. We should not follow the tradition way of setting up your speakers like the bed layers do. The Home Theater Guru chap utilise trial and error AFTER he went through the studio layout vs the consumer layout recommended by Dolby in its white papers got consumer market and found the difference. He’s the first to point out the difference, hence he keep refining to get the best layout. This is a follow up video to his previous one.

1 Like

Peak and null REW reading question/explanation.

I helped my friend run REW for his HT in the living room.
His response curve turned up, there are peak at 50-60hz and 72-80hz.
No deep dips.

What is the effect ?