Creating a “House Curve” using ARC Genesis
STEP 1
Before we start, there are a few things that you will need to get it right first. Here’s a snapshot of the pre-requisites:
a) After ARC calibration, check to ensure that you have run the auto phase alignment. A rule of thumb is to upload the ARC file (.arc3) to your Anthem AVM/MRX first, then perform the auto phase alignment.
b) After completion, remember to use REW to check the phase values given by ARC is correct. Run a sweep to ensure there is no major “peak” or “dip” in your subwoofer response. Pay particular attention to the frequency range below your Mains crossover – e.g. 80hz.
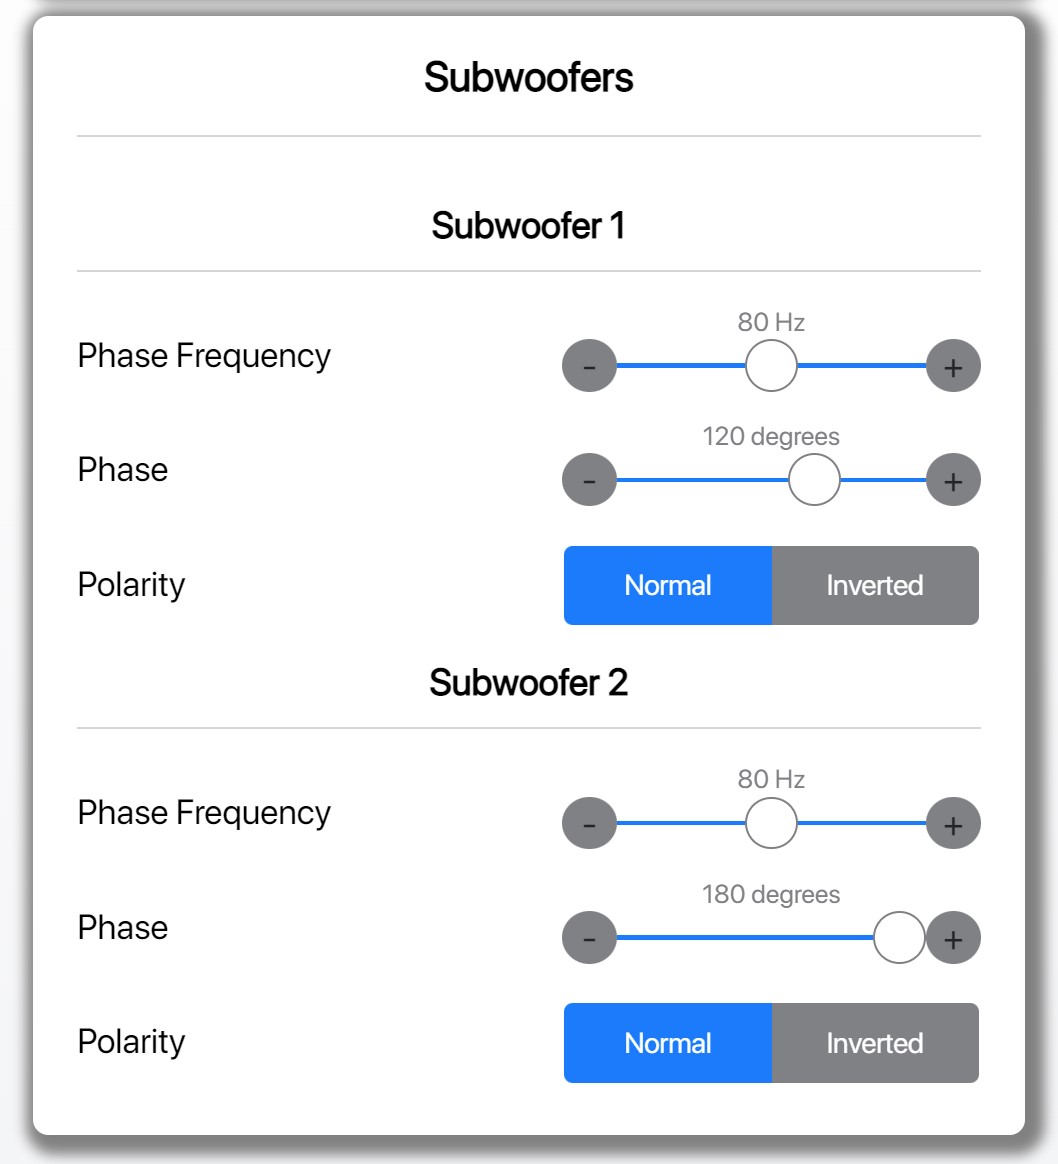
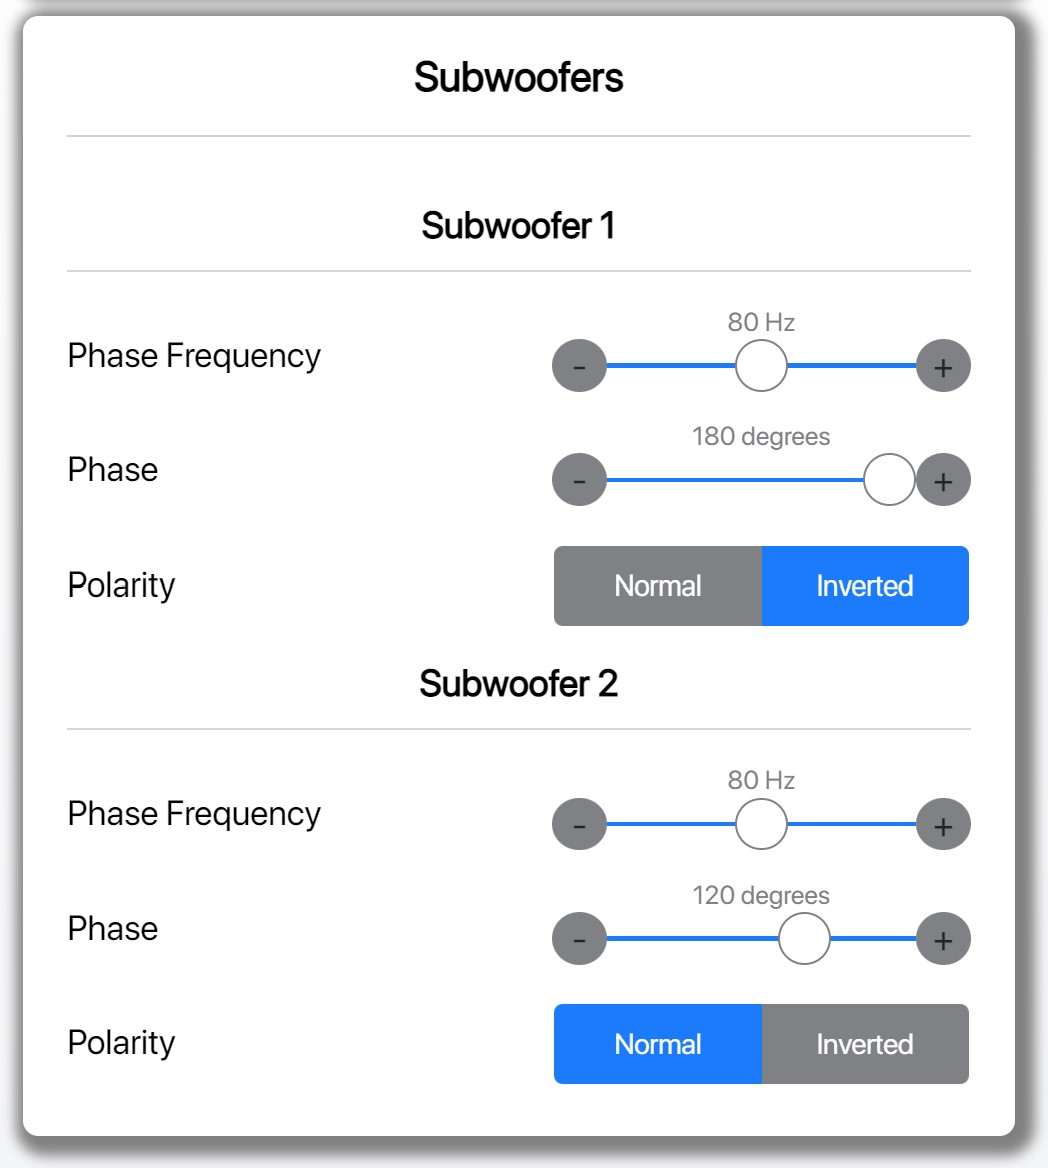
c) For those with 2 or more subwoofers, if you see a significant peak or dip, the easiest way to “fix” it is to go into the Web UI (192.168.XXX.XXX) and flip the polarity switch from “Normal” (0 degree) to Inverted (180 degrees) on one of your subwoofers (pair).
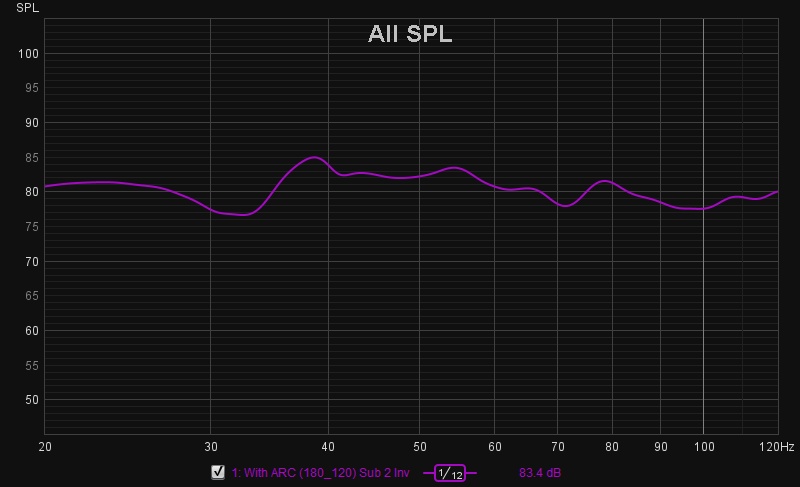
d) If ARC gets it right, your graph should look something like the one shown below. If not, perform the “polarity switch” which I have mentioned above. If still can’t get it right and you are still seeing big variations in peaks and dips, then you have a fundamental issue. Check your ARC results on the subwoofers and confirm this is something that even ARC can’t fix after calibration. If so, this is a room mode issue. You will either need to move your subwoofers to another location or your MLP. Re-measure again after each change. I know this is a tedious process but a necessary one.
Once that is completed, we can now move on to the ARC Genesis software. Go to the [Adjust Targets] tab and we will be focusing on 2 key areas – i.e. System-Wide Target and Subwoofers.
STEP 2
System-Wide Targets adjustments
Specifically, we will play around with 3 settings – i.e. Room Gain, Deep Boost Bass and Deep Bass Boost Centre. The rest like Tilt Level and Room Gain Centre Frequency can be left intact. Notwithstanding, those having issue with harsh trebles might want to experiment with the Tilt Level or lower your Maximum Correction Frequency. If your speakers are high performance type, limiting the correction to between 1KHz and 500Hz will usually bring out the best performance since it prevents ARC from neutering the speaker “original” sound signature that you have fall in love in the first place. Personally, I found 500Hz commands a “wider” sound stage but YMMV as your room mode plays a part in how your overall system will sound. So, experiment the various maximum correction frequency range until you find one that suits you. Only you can “hear” the difference.
By default, the Deep Bass Boost Centre value is 50Hz. What you will see is a gradual “arc” starting to peak from 50Hz and below. As far as creating a “house-curve” is concerned, ARC is doing it right, since our human auditory perception of loudness will gradually decrease as we delve deeper into the modal frequency range (from say 35Hz down to 20Hz). This is what Audyssey’s Dynamic EQ (DEQ) is trying to achieve for creating a dynamic house curve but we all know the theory is sound but the implementation fall short. For most of us coming from the Denon and Marantz, you will know DEQ have some side effects like having a higher SPL for the surround channels if we are not listening at or near reference level (0 dB). ARC’s implementation is much more refined and elegant as it does not affect the surround channels or any channels for that matter. By focusing solely on the subwoofer responses, any change in audio perception will be targeted on the subwoofer alone while leaving the rest of the bed speakers intact.
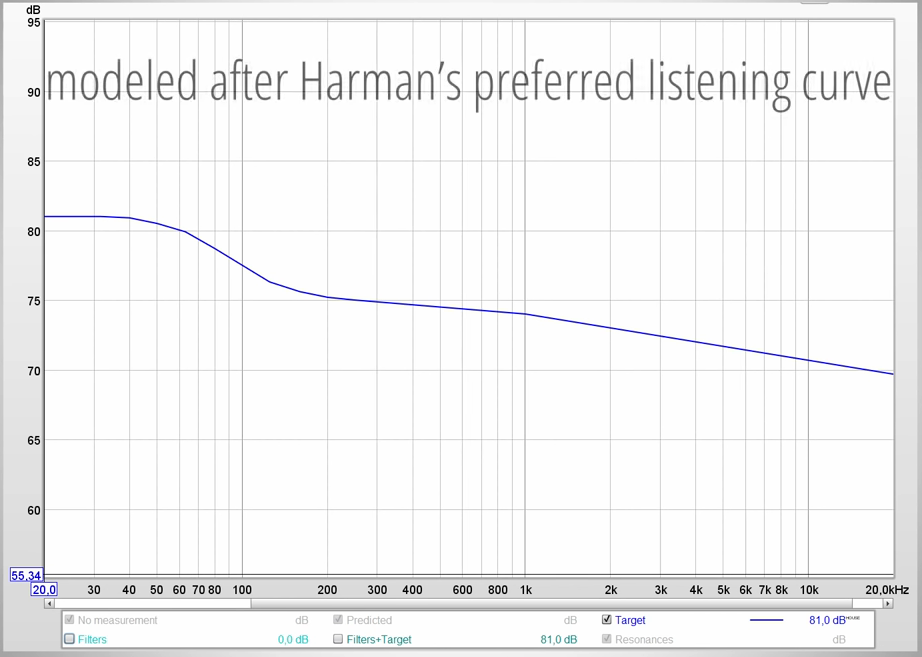
The Harman “House Curve”
I always fall back on the Harman house curve which has a gentler incline starting from 200Hz until it peaked at about 50Hz and end with a plateau from here to around 10Hz (depending on the type of subwoofer drivers you have – e.g. 8” driver vs a 15” driver).
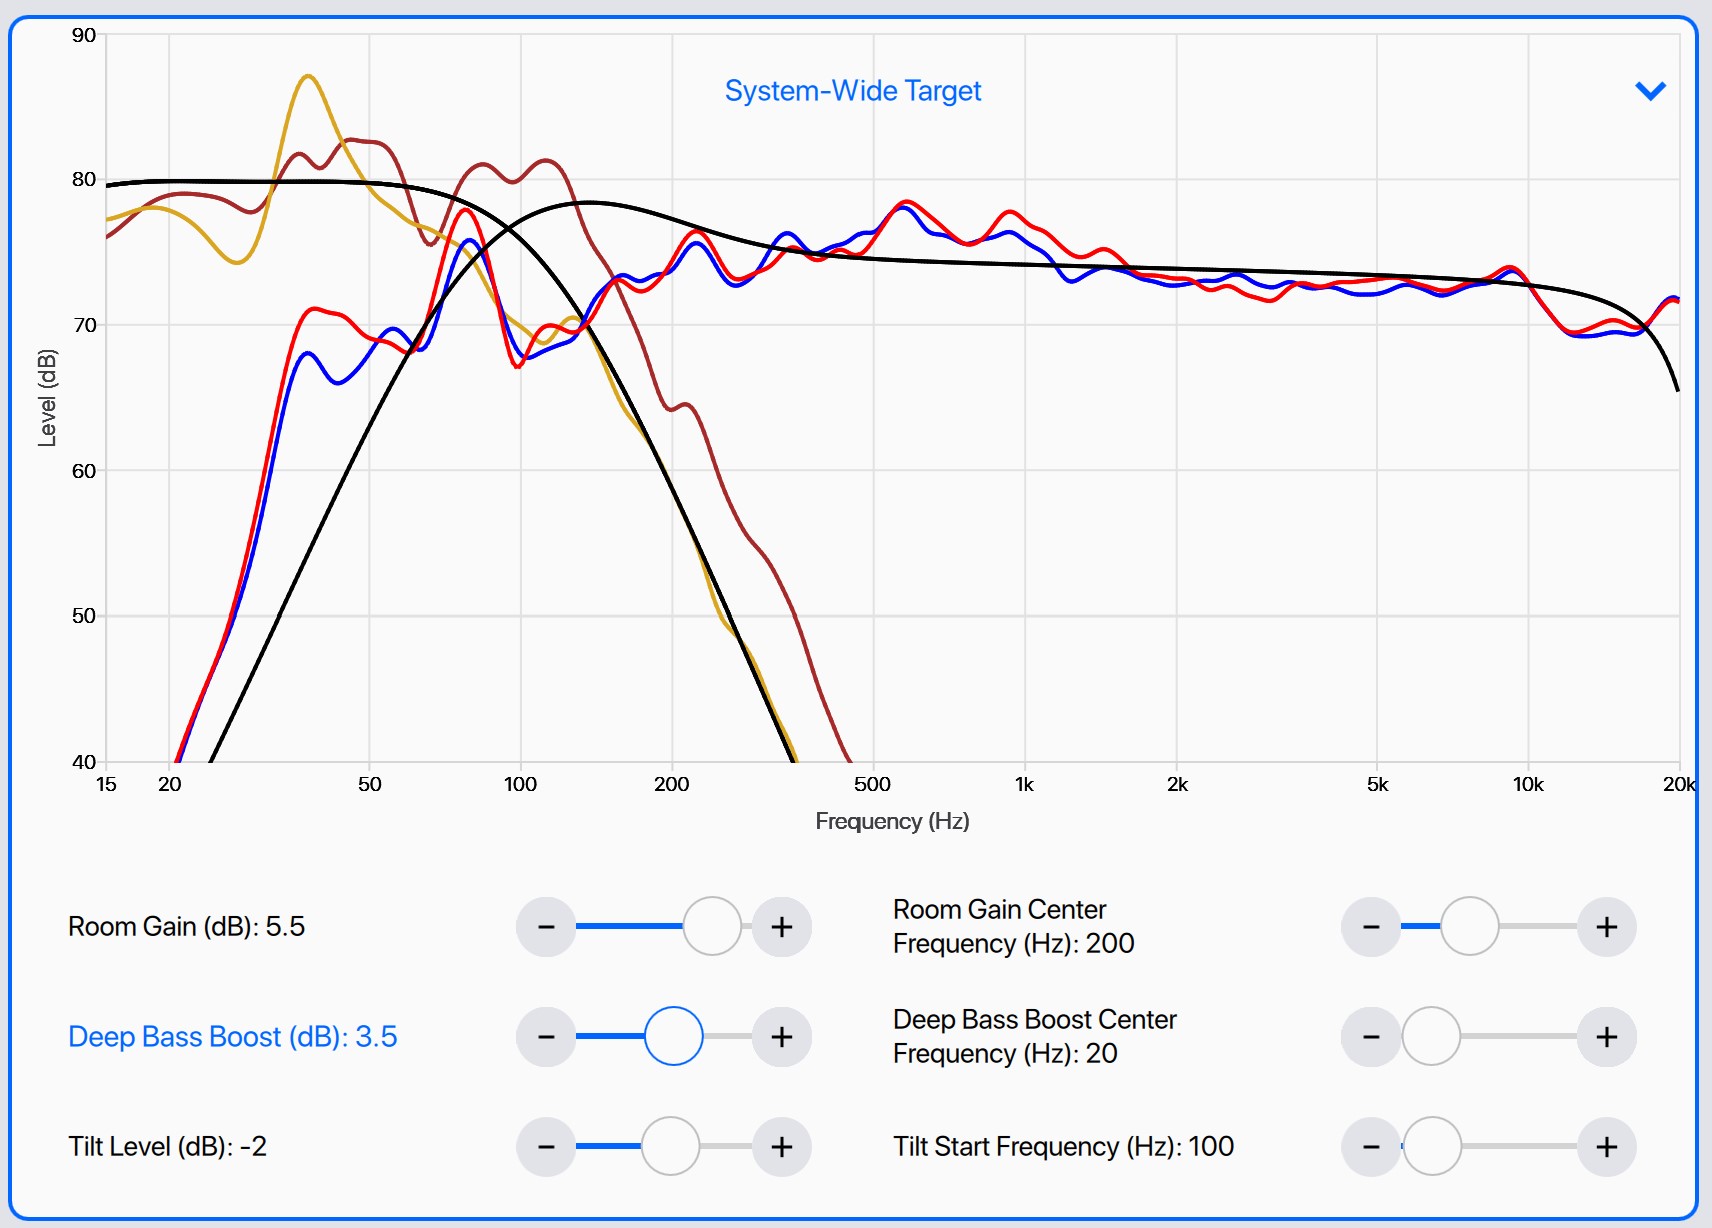
As you can see, ARC Genesis default for Room Gain Centre is set at 200Hz while its Deep Bass Boost default value is set at 50Hz. Can you start to see the correlation between Harman house curve and ARC Genesis algorithm? What we are trying to achieve here is to emulate the response curve as close to the Harman house curve as possible. To do that, we will need to adjust those 3 settings which I have mentioned earlier.
Deep Bass Boost and Centre
First, lower the default value of 50Hz to say 30Hz or 20Hz. What you will see is that the arc at 50Hz and below will start to register a drop. Next, slowly move the slider on the Deep Bass Boost setting until you see the “tail end” of the curve slowly ascend and becomes flat.
Room Gain
Slowly increase the room gain until you reach around 80dB. This value is largely based on preference (individual taste) hence there is no right or wrong but at the minimum, you will need to register at least a +6dB to +8dB increase from the frequency range between 50Hz and 20Hz or lower. Recall what I have mentioned previously about the human auditory perception where we need to increase the gain or master volume to get back that “missing” LFE? The steps we are doing now is to reclaim back the “missing” LFE and that rumble.
Assume you done everything right. You should be able to see your subwoofer response curve to look something like the one depicted above. Notice the close resemblance to the Harman house curve?
Note: It can be very challenging for some of us who have long-sightedness if we look at the graph at the default zoom level, so make sure you “zoom” into the graph as you made those adjustments. How do you zoom in? Well, there is a (+) sign, click on it several times to zoom in for a much better look at the subwoofer response.
Next scroll down to the subwoofers segment and you will see a change in the black target curve now. The change is effected when you play with the System-wide Target settings. DO NOT attempt to make any change to the target curve. Note: Sometimes, you will see 2 different set of subwoofer target curves like the one depicted below:
This is due to the use of different brands and models of subwoofers. If you mix and match your subwoofers, this is likely what you will get. I also face this issue even though my 3 subwoofers are of the same brand (JL Audio E series) but the difference is in the size of the driver. For instance, my front pair of subwoofers are JL Audio E112 (a 12” driver) while my single rear subwoofer is a 10” driver. This results in a difference in High-frequency Extension with my front pair having the High-frequency Extension at 140Hz while the rear subwoofer is at 90Hz. To overcome the issue of having 2 different subwoofer target curves which can disrupt the phase harmony of the subwoofers, I have lowered my High-frequency Extension for my front pair of subwoofers from 140Hz to 110Hz while my rear subwoofer’s High-frequency Extension was raised from 90Hz to 110Hz. This resulted in a single union target curve for all my subwoofers. Just a tip, recall most Hollywood blockbusters have LFE authored up to 120Hz. So, you can use that as a baseline for your High-frequency Extension when adjusting in such cases.
STEP 3
Once you are satisfied with the house curve and the changes effected on the subwoofer segment, hit <Continue> to allow ARC to re-calculate the new settings you have made.
Under the [Review Summary & Upload] section, scroll down to the subwoofer response curve and make sure you did not spot any drastic change in the subwoofer response curve. Pay particular attention to the “green curve” with ARC adjustments incorporated. If changing the High-frequency Extension values on the subwoofer segment earlier in the [Adjust ARC Settings] section, caused the “green curve” to deviate from the black target curve, you will need to select another High-frequency Extension value that will ensure the ARC adjustments made to the subwoofer response will not be impacted by the change in High-frequency Extension. Trial and error until you get a good response. For each change, make sure to hit <Continue> to let ARC re-calculate the values.
STEP 4
Finally, perform an Upload to the Anthem AVM/MRX. Demo a few of your favourite demo clips and enjoy fuller sounding and undistorted bass.
Hope the above tutorial helps. If you have any questions concerning any of the steps, do post in this thread and I’ll try my best to answer.