*Official Thread* Anthem AVM 70 & 90 and MRX 540, 740 & 1140

Ya I suppose no choice, if have to choose, opt to go with a perfect blend for centre speakers with subs. Sacrifice the surrounds. Majority of content from centre speakers anyway…

So if no choice have to sacrifice; sacrifice the surrounds. don’t sacrifice centre with subs blending

My mrx1140 is giving me a PROTECT A AMP error. I’ve pulled out all the connections and the power plug but it won’t come out of the protection mode.

Anyone have such an issue? Any idea what to do?

Did you change any speakers or cables of late? How did you connect your speaker cables? exposed or with any connector/plug?

Try to remove ALL speaker cables and HDMI cables. After which try power up the unit. If it works, then one of the speaker cables likely causing a shorting. check to make sure no “exposed” speaker cables touching the speaker binding post.

I installed a dynasty pro audio wireless kit for one of my subs and was re-doing the ARC when the receiver suddenly shut down. I removed all the connections including HDMI and speaker cables but still no avail so have sent it in to the service center at Funan.

They mentioned it might take over 4 weeks to resolve the issue including testing and ordering any spoilt parts.

bad start for the next few weeks as it was my main machine for the hall. thankfully still under warranty.

hmmm… hope this is an isolated case.

ADVANCED ANTHEM ROOM CORRECTION TIPS AND TRICKS

PART 1

There are many ARC experts in the AVSForum or even a dedicated Facebook group dedicated to Anthem AVM/MRX users but none are willing to share how they do it. Worse, some even charged a fee just to modify the user’s arc file. I don’t really believe that knowledge sharing should have a “price tag” attached to it.

I will be sharing my ARC calibration technique with you FOC! While it is true that ARC can provide some really good baseline results to improve the overall sound quality of your systems but you can actually “do more” to improve the overall sound quality. The technique I am about to show you comes from my own experience and through numerous trials and errors that can help to bring your sound quality to the next level.

Caveat
This tutorial will contain numerous screenshots and there is always a limit to what screenshots can tell. For those interested to find out more…you can always join my Anthem Room Correction Workshop which I hold mostly over Saturdays. Follow this thread: Anthem Room Correction Genesis (Workshop + Demo) for details.

Without further ado, let’s do it…

Pre-requisites
Before starting to play with the advanced settings, it is expected of you to have already completed your ARC and phase calibration, meaning you should already have an existing .arc file. If you haven’t, pls do you calibration and come back to this thread again.

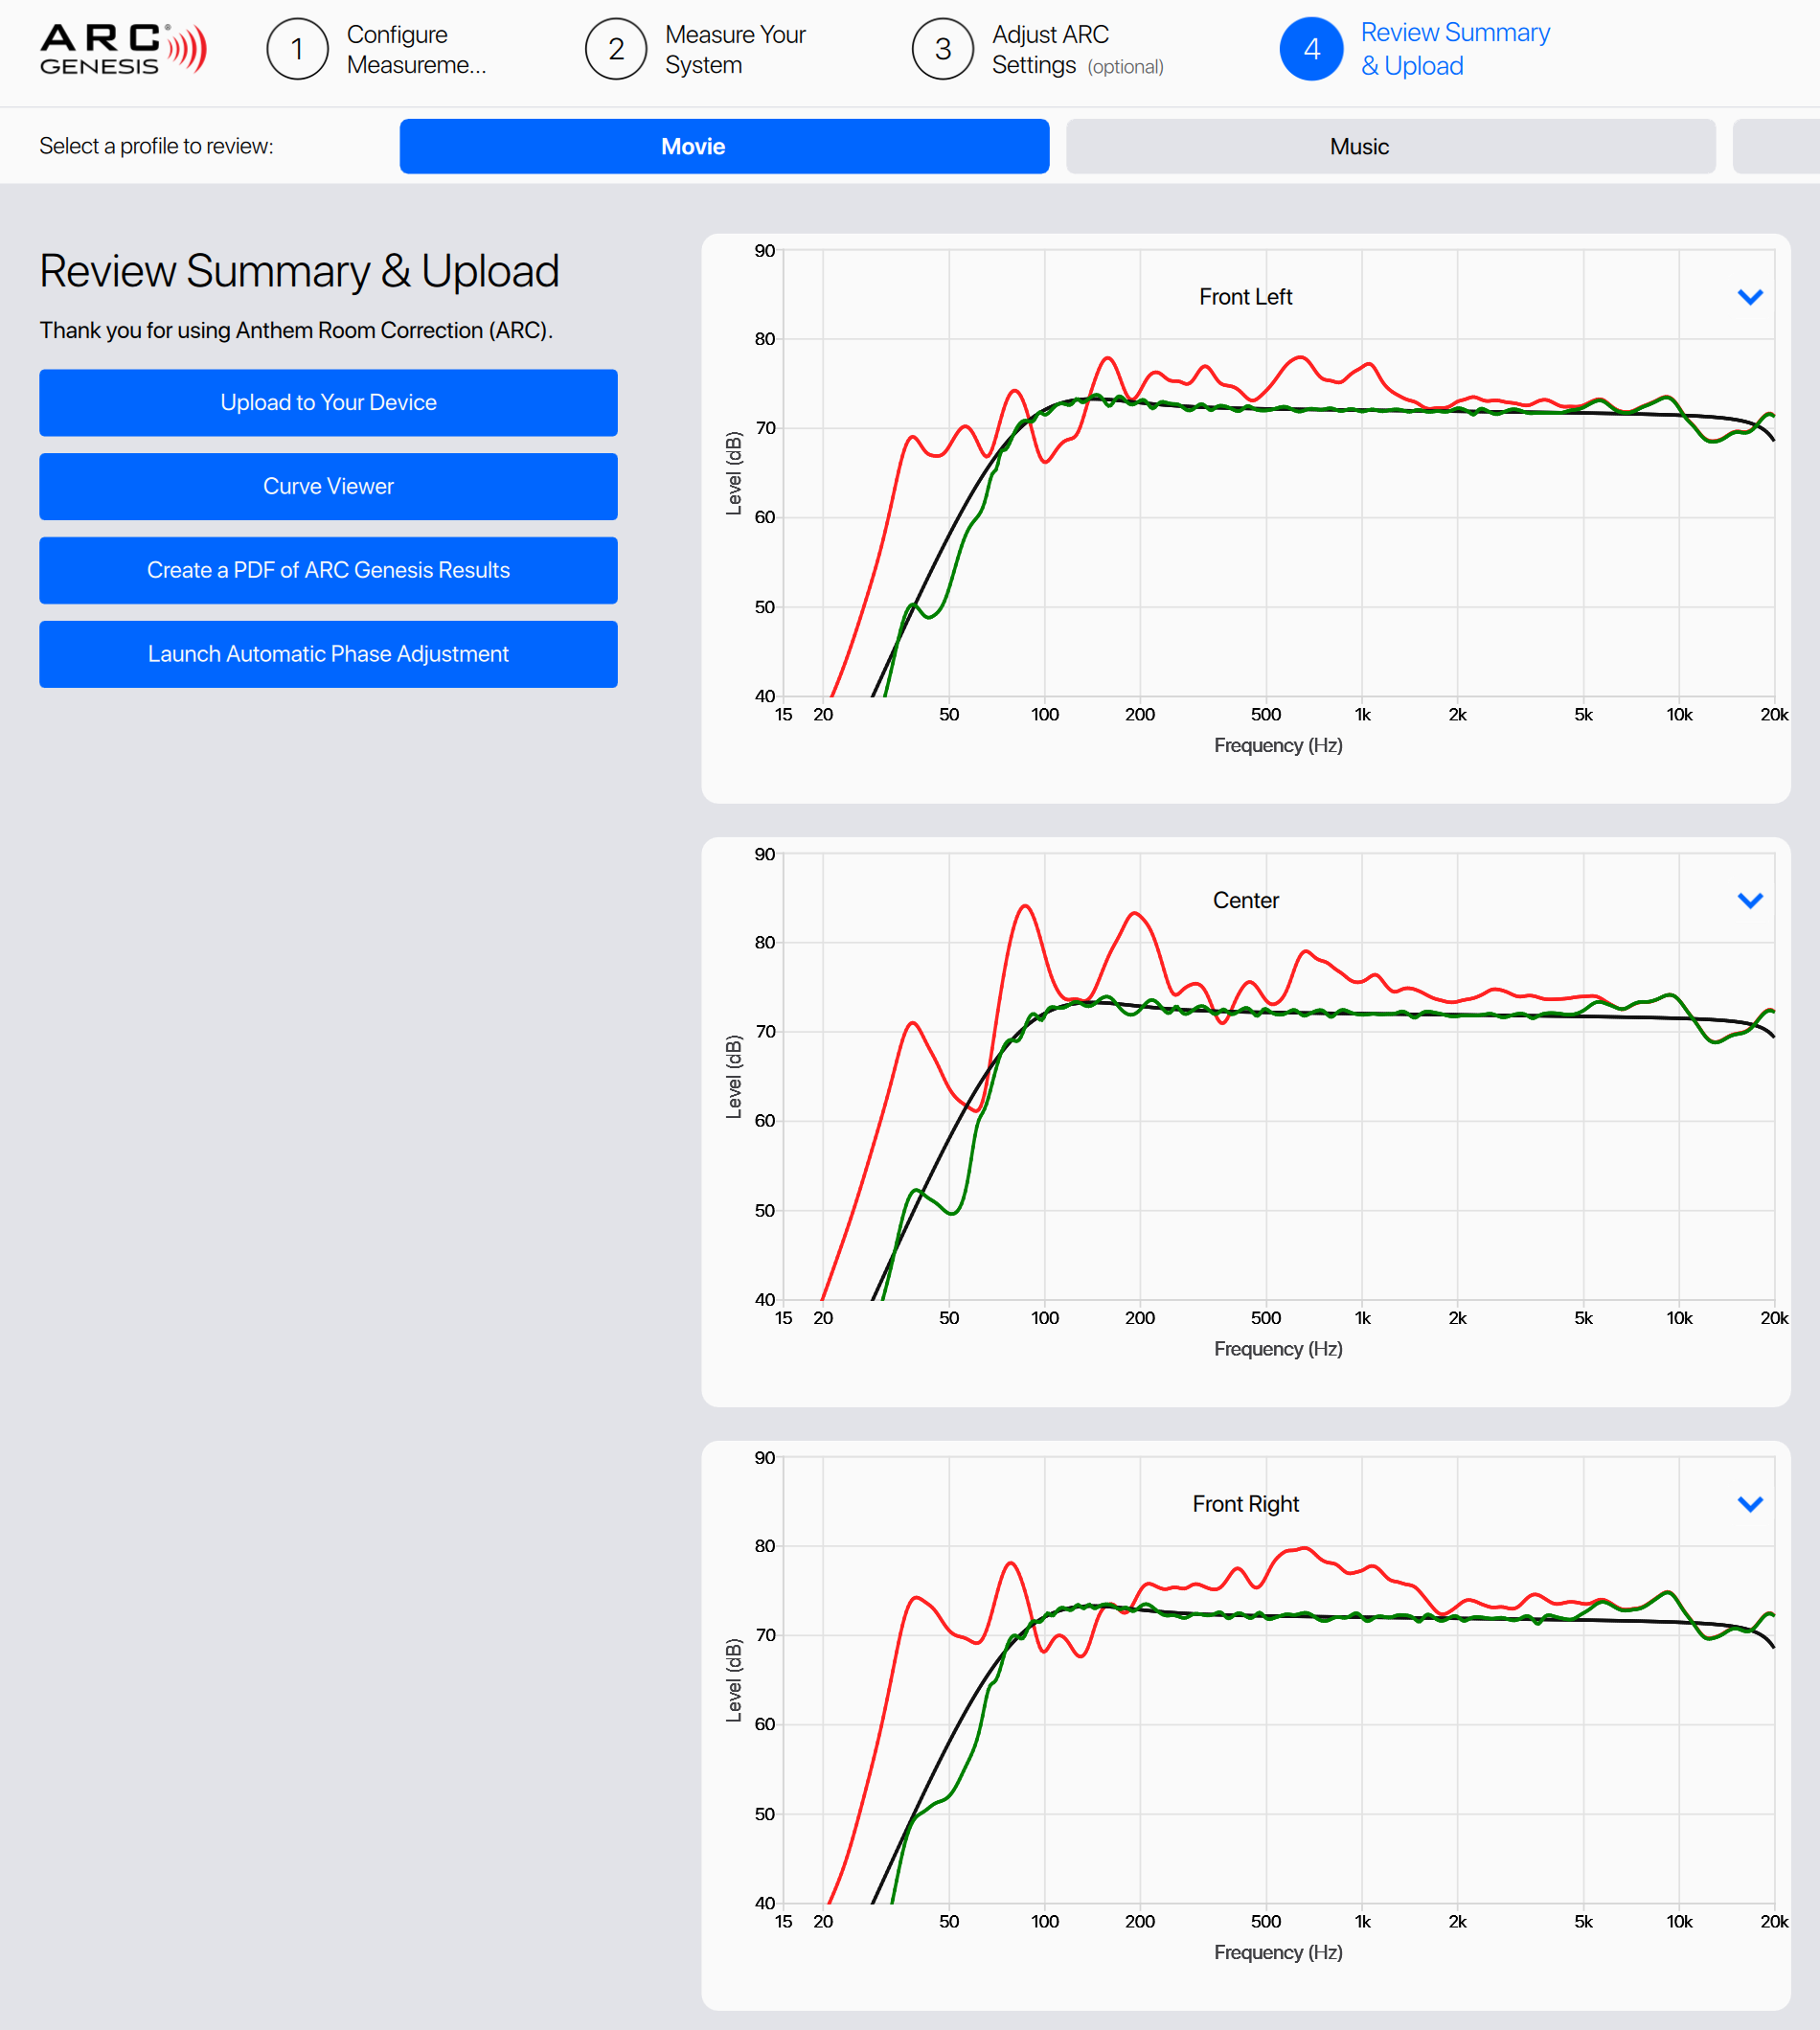
  • First, open the arc file. Go to [Step 3:Adjust ARC settings] > Adjust Targets > Select one of the profiles. For demo, I will use “Movie” Profile.

  • Take a close look at the “default” System-Wide Target values provided by ARC. Leave all the settings and values intact (at this point). You can click on the image for a bigger view.

  • Next, select [Step 4: Review Summary & Upload]. Take a look at how the freq responses of all your speakers.

  • As you can see from the screenshot, the calibrated freq response curve (depicted in green) for the mains (front left and right) are far from ideal, especially so for freq range between 100Hz and 150Hz. In an ideal scenario, the green line should “hug” the target curve (depicted in black) as closely as possible for the best sound.

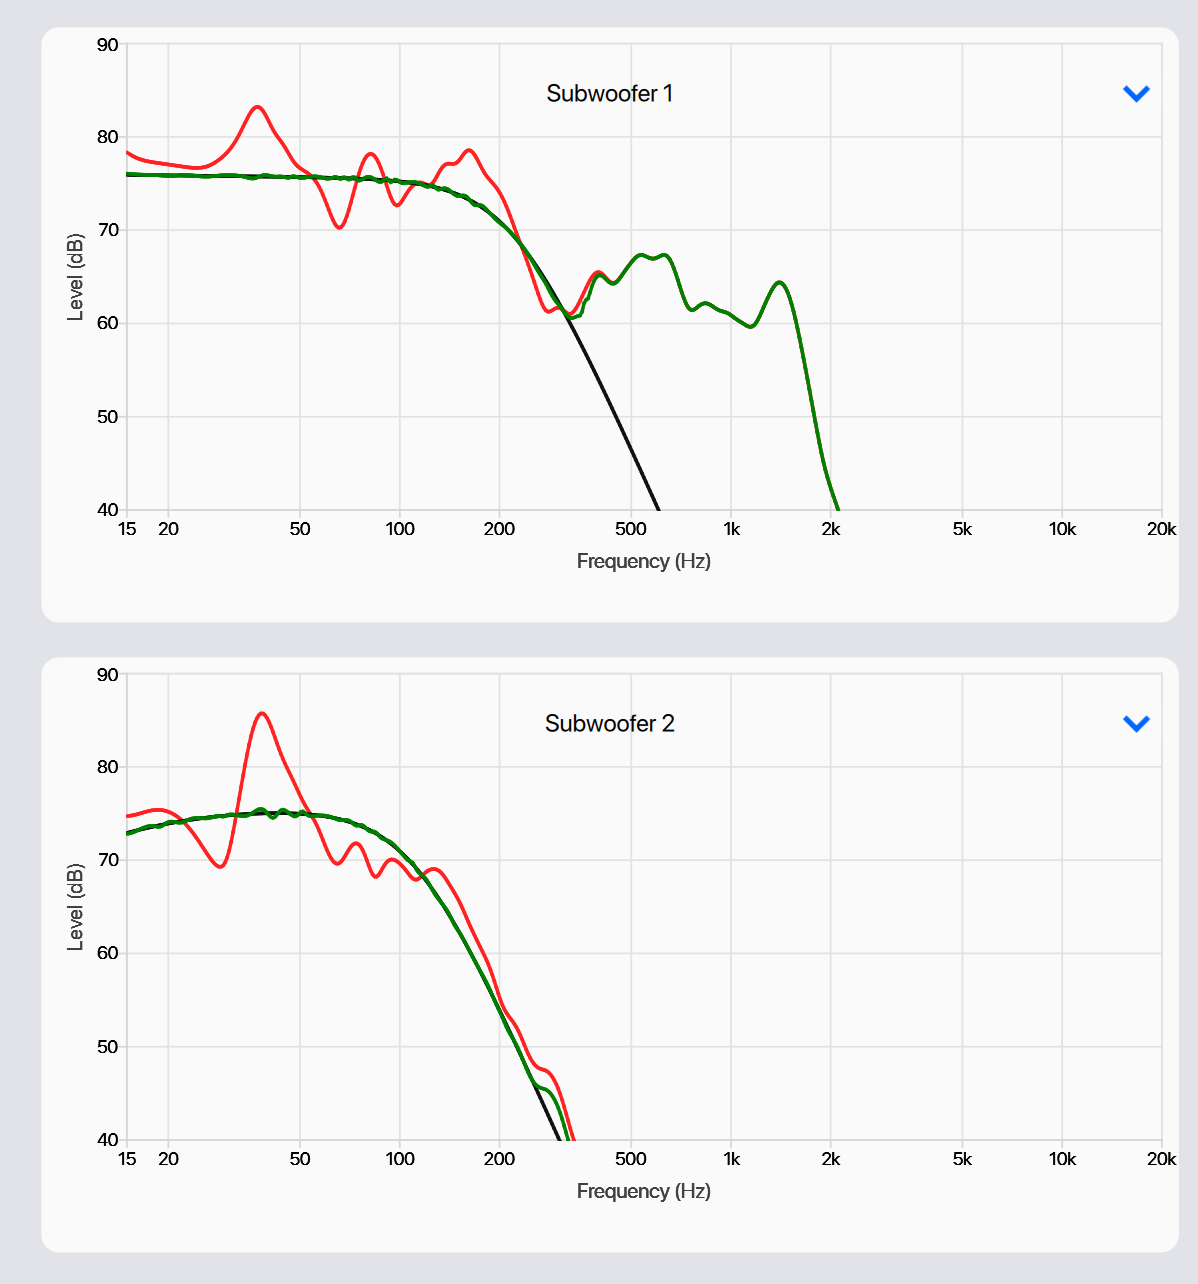
  • Let us take a look at what the subwoofer response curve looks like by scrolling the page all the way down.

  • Once again, the default curve (depicted in green) showed some small dips in the overall output level at 72 Hz for Subwoofer 1 and a couple of dips at 35Hz and 65Hz. On the bright side, the dip in output level is less than 5dB and to some, it may not have much of an impact during movie viewing but if you really want to “recover” some of those loss output, you can do that.

  • This tutorial will help make the freq response curve to conform to the target curve (black). Here’s the final results after making some adjustments to the advanced settings for:

Improved Mains response

Improved Subwoofer response

1 Like

PART 2

  • After viewing the results, now you will have a better idea of what to improve. Focus each speaker at a time. The key speakers that we need to fix will be the LCR and the subwoofers. The rest of the speakers are not so important. Let’s begin…

  • Select [Step 3: Adjust ARC Settings] > Set Speaker levels.

  • As you can see, ARC has calibrated to the proverbial reference level of 75dB. Unless you are living in a perfect anechoic chamber with a similar speaker setup, you will never get a good response. Recalled, most of the “big dips and peaks” are the result of your room mode. At default, ARC will provide a good baseline for the majority of the use cases but it ain’t perfect.

  • The trick here is to play with the system-wide levels (depicted as a black horizontal line). ARC allows a range of 6 steps ranging from -3 to +3. Any changes made to this “system-wide” level will ultimately impact the target curve (depicted in black as mentioned in my earlier post). As you can see, the Front Right speaker has quite a nasty dip between 100Hz and 200Hz.

  • To improve the freq response for the main, we want to “shift” the black line downwards by invoking the (minus - ) sign. I have dropped the level to around -2.

  • As you can see, after adjusting the system-wide level to -2, the nasty dip for the front right speaker is far from ideal.

  • Still, under [Step 3: Adjust ARC Settings], select “Adjust Targets”. Click on the dropdown list in the upper right-hand corner of System-Wide Target and select "Autodetect (System-Wide Target and All Channels). Invoking this option will make ARC re-calculate the speaker crossover and high-freq roll-off figures. In short, it will re-adjust the target curve of each speaker and subwoofer(s) to conform to the new one - i.e. system-wide levels set at -2 instead of “0”.

  • Take a look at the re-adjusted System-Wide Target. A noticeable change will be the Room Gain jumped to 3.125 from the default 3.0

  • From here, navigate to [Step 4: Review Summary & Upload] to allow ARC to re-calculate the results.

  • As you can see, there is a vast improvement to the freq response for Front left speaker but the Front right speaker still requires some work to be done. There are 3 methods to improve the “nasty dip”.
  1. Adjust the Room Gain Center Freq
  2. Adjust Tilt level + Tilt Start Freq (Hz)
  3. Adjust the channel level under “Set Speaker Levels”.

You can apply one or a combination of methods to achieve a smoother freq response.

  • Since we know the dip occurs between 100Hz to 200Hz and the Room Gain Center Freq is set to 200Hz (default), you can lower the value to 150Hz.

  • Next, you can decrease the Tilt Start Freq (Hz) from 100 to 0. Coupled with a tilt level (dB) of -1.5 will shift the target curve (depicted in black) further down starting from 100Hz all the way to 20Khz.

  • Now go to each individual speaker and highlight the corresponding “dropdown” list and select “Autodetect”. ARC will re-calculate the crossover setting and high freq roll off values.

  • Go to [Step 4: Review Summary & Upload] one more time to allow ARC to re-calculate the results based on the changes made to Room Gain Center Freq and the Tilt settings.

  • As you can see, there is a drastic improvement made to the Front right speaker now after using the 3 methods described above.

  • So can we improve that even further? You bet!

  • If you think that little 1.5dB drop is output is something that annoys you. You can use the 3rd method, “Adjust the channel level”.

  • By adjusting the channel level from the default 4 to 5.5, you are bringing the entire freq curve nearer to the target curve or black horizontal line (at -2). This will ultimately eradicate the “small dip” once and for all. Take a look at the final product below:

  • Scroll down and take a look at the subwoofer freq response and you can see there is a corresponding improvement to the freq response as well. It followed very closely to the “target curve”. See comparison of the before and after.

BEFORE

AFTER

  • Lastly, upload the results to your AVM/MRX. Enjoy the new sound and bass!

  • Remember to save the arc file or create a new copy if you wish to retain the original (unmolested) copy in case you think the original one sounds better to you. That will be kinda hard…if you really do, then you are not doing it correctly…

Conclusion
So what do we learn? You can literally spend hours playing with the settings. If you truly grasp the essence of this tutorial, it is all about “iterative tweaking” to certain key settings in the following order:

  1. System-Wide Target level
  2. Room Gain Center Freq
  3. Tilt Center Freq and output
  4. Adjust individual channel level

Knowing which settings to focus on will yield the results you desired. Start exploring yourself. It is all about experimentation. Remember your AV gears and room modes are way different from mine. This tutorial serves as a reference guide on what you can do to achieve quality sound and bass.

More advanced tips to come…

Tweak the subwoofer settings

The next part of my advanced tutorial will focus on what can or cannot be done. For instance, you can learn how to alter the settings in the Subwoofer setting in Low-Freq Extension Slope to “flat” (if you know your subs are capable to go flat at 20Hz easily) from whatever slope assigned to you by default. Knowing what settings to play with is important to achieve even better bass and speaker integration.

For those who still don’t quite grasp the fundamentals of this tutorial can join my workshop. Just drop me a PM.

3 Likes

HI Desray,

In your testing, what is your preference on the correction frequency range?

As you have shown, one can adjust the calibration levels to also limit the correction frequency, say between 500hz or 1khz.

Typically the worst of room response issues are below 500hz, and the upper ranges can be the native unaltered response of the speakers.

If for movies, I will go up to ARC recommendation of 5KHz for max correction. You can go lower depending on the freq response. I believe you already know what will happen if you do max correction for every speakers. ARC only has a finite amount of correction. If the sound is too harsh or bright, instead of going full freq correction, one can opt to play with the tilt setting.

If for 2 channel listening, I may go for full correction or limit the correction to 500Hz if my mains already have a very flat response or close to the target curve.

Bro @desray u have the most experience with ARC since.
Really appreciate your own time, efforts and consistent sharing v helpful for the local Anthem members!

Thanks a lot!

1 Like

Very informative …

1 Like

Oh, I wasn’t aware of the limitations of correction… How does this work? I read that ARC used IIR filters only, and doesn’t do FIR phase correction, or mixed phase filters like Dirac. So no perfect triangle step responses post correction, unlike Dirac. The FIR phase correction has limited ‘taps’ and so will run out if used carelessly.

Regarding the HF tilt, I’m aware we can set X curve like tilt, eg from 1khz upwards, to 20khz, a couple dB slope.
But from my testing, this seems to require full range correction to 20khz ? Otherwise, how will ARC ‘trim’ down the top end to follow the X curve tilt?

Thanks for your sharing!

Ps: still waiting for Pt 2 of the MK subwoofer review! :grin:

1 Like

I was told by some “experts” in the Anthem FB page as well as the advice from Anthem itself that freq correction should avoid going beyond 5Khz as far as possible as you will be wasting it due to the limitations of the Anthem calibration mic isn’t as accurate during calibration when go beyond that default range (5Khz). In short, it is less accurate and you may risk over correcting what is not suppose to be corrected even when the graph shows you there is a dip or peak. This is not a Trinnov so don’t expect sophisticated computational powers to handle all these.

1 Like

The same theory applies as above. You can do full range correction but just be mindful of the limitations that the mic and in room response. Remember post calibration graphs is a supplementary tool to help understand the room limitation that you are facing…big dips and peaks are mostly caused by room modes…instead of doing full range, correct up to 5Khz as recommended by Anthem first and see how it sounds to you first.

I totally forget about that.

I have been editing arc files for a handful of AVSForum and some Anthem FB members along the way and I have been using the techniques I have posted here to help them and have met with success majority of the time. I can’t say it is a fool proof or a perfect solution as there are other factors which are beyond my control. Examples include the placement of your speakers and subs, types and the characteristics of the speakers used and most important of all, the room itself. Nothing beats an on site calibration and make finer adjustments to the ARC settings as we go along. The methods I am sharing provides the basis to anyone to play with during the post ARC calibration journey. It is fun and it can be tedious. I learn to believe that listening is “believing”…it is not about getting a perfect freq response on a chart that matters…as there is literally NO WAY you can get a perfect response for all speakers and subs as a result of the room. For that, I think Anthem ARC is considered pretty darn good at fixing most of the room mode related issues compared to Audyssey. Anthem focused on the freq range that matters and leave the rest to the speakers to perform what it suppose to do in the first place. Over correction will rob the uniqueness of the speakers. No one size fits all solution. Experiment is the key here.

3 Likes

Very clever ! This is the exact technique I used when calibrating Petetherock’s square room 4 years ago…

It’s the only possible way to get amplitude to sound “balanced” in his square room, because of the lack of acoustic treatment in the room.

Here is my take on the above approach:

The caveat here is this approach sacrifices “headroom” in exchange for a linear in room amplitude response, technically you are just calibrating for “Levels”

Most often it will be ok when used in small rooms, ie 3x4m rooms or 5x4 meter rooms and if someone doesn’t blast the system down to reference levels .( I do know some folks who tend to listen at reference levels in small rooms with acoustic treatment in place. ) In bigger HT rooms or 8x 10m rooms and with acoustic treatment in place, headroom counts towards this because of the distance of listener’s listening position from speakers. More levels/ amplitude is required in a bigger room.

Couple this with “Dialnorm” offsets on the dolby file, suddenly one will find themselves needing to increase the volume/ gain settings on the avr or processor

Finally, the approach applies lotsa correction filters to “cut away levels” so as to match that DIP in overall amplitude response. Depending on how much one decides to cut. Remember, too many correction filters often makes the sound worse off. This can be seen in time domain information but cannot be seen on the amplitude graph. This is one big reason audiophiles don’t like to use room correction, because of over equalisation. So one will need to be careful between getting the amplitude right and having over equalisation

In my personal experience, one should generally not apply more than 3 (cut) eq filters in the bass region. As you add on more filters, u start to hear the “EQ” sound. Some can hear this, some can’t . If one can’t hear this “eq” sound… that’s perfectly fine…

1 Like

how long is the Anthem local warranty? (AVM or MRX)

2 years local warranty.

2 Likes

Had a chance past weekend Sunday to pay bro desray a visit. Intention was to check out the Lumagen Radiance with the NZ7, the MK subs was a bonus and of course cant miss giving it a listen since am already there.

As usual, i “absorbed” (the knowledge from desray) as much as i can as the explanation was ongoing, Lumagen indeed live up to its name for the fraction of MadVR after seeing the end result, and one thing we can all agree on is that the GUI will really frustrate you just by the look of it, not to mention going through the actual work of calibrating. If only the GUI can further improve and not causing much of a confusion, its really a great piece of device that i would want to own. Overall PQ is just wonderful and pleasant to the eyes.

As for the SQ, it is pretty remarkable i would say, since my last visit was the JL Audio subs, the MK provides more body and weight to the overall ambience IN HIS ROOM (as usual, bigger room requires more and/or bigger subs according to physics). I do experience the same feel in my room on the overall presences and pressure when i changed my 4 x 12" Stereo Integrity SQL customs to the 2 x DefTech DN15.

Putting myself in his preference (not ULF kind of guy), the MK gives enough “weight” to the mids, can feel it doesn’t really go down until 20hz but good enough for enjoyment, at least better than the last JL Audio, again in his room…

Surround was good and does not give a sense of presence of the speakers when listening with Neural X . Overall really great!

Thanks for hosting me on the last min request, i had an enjoyable 2.5hrs or fun :slight_smile:

4 Likes