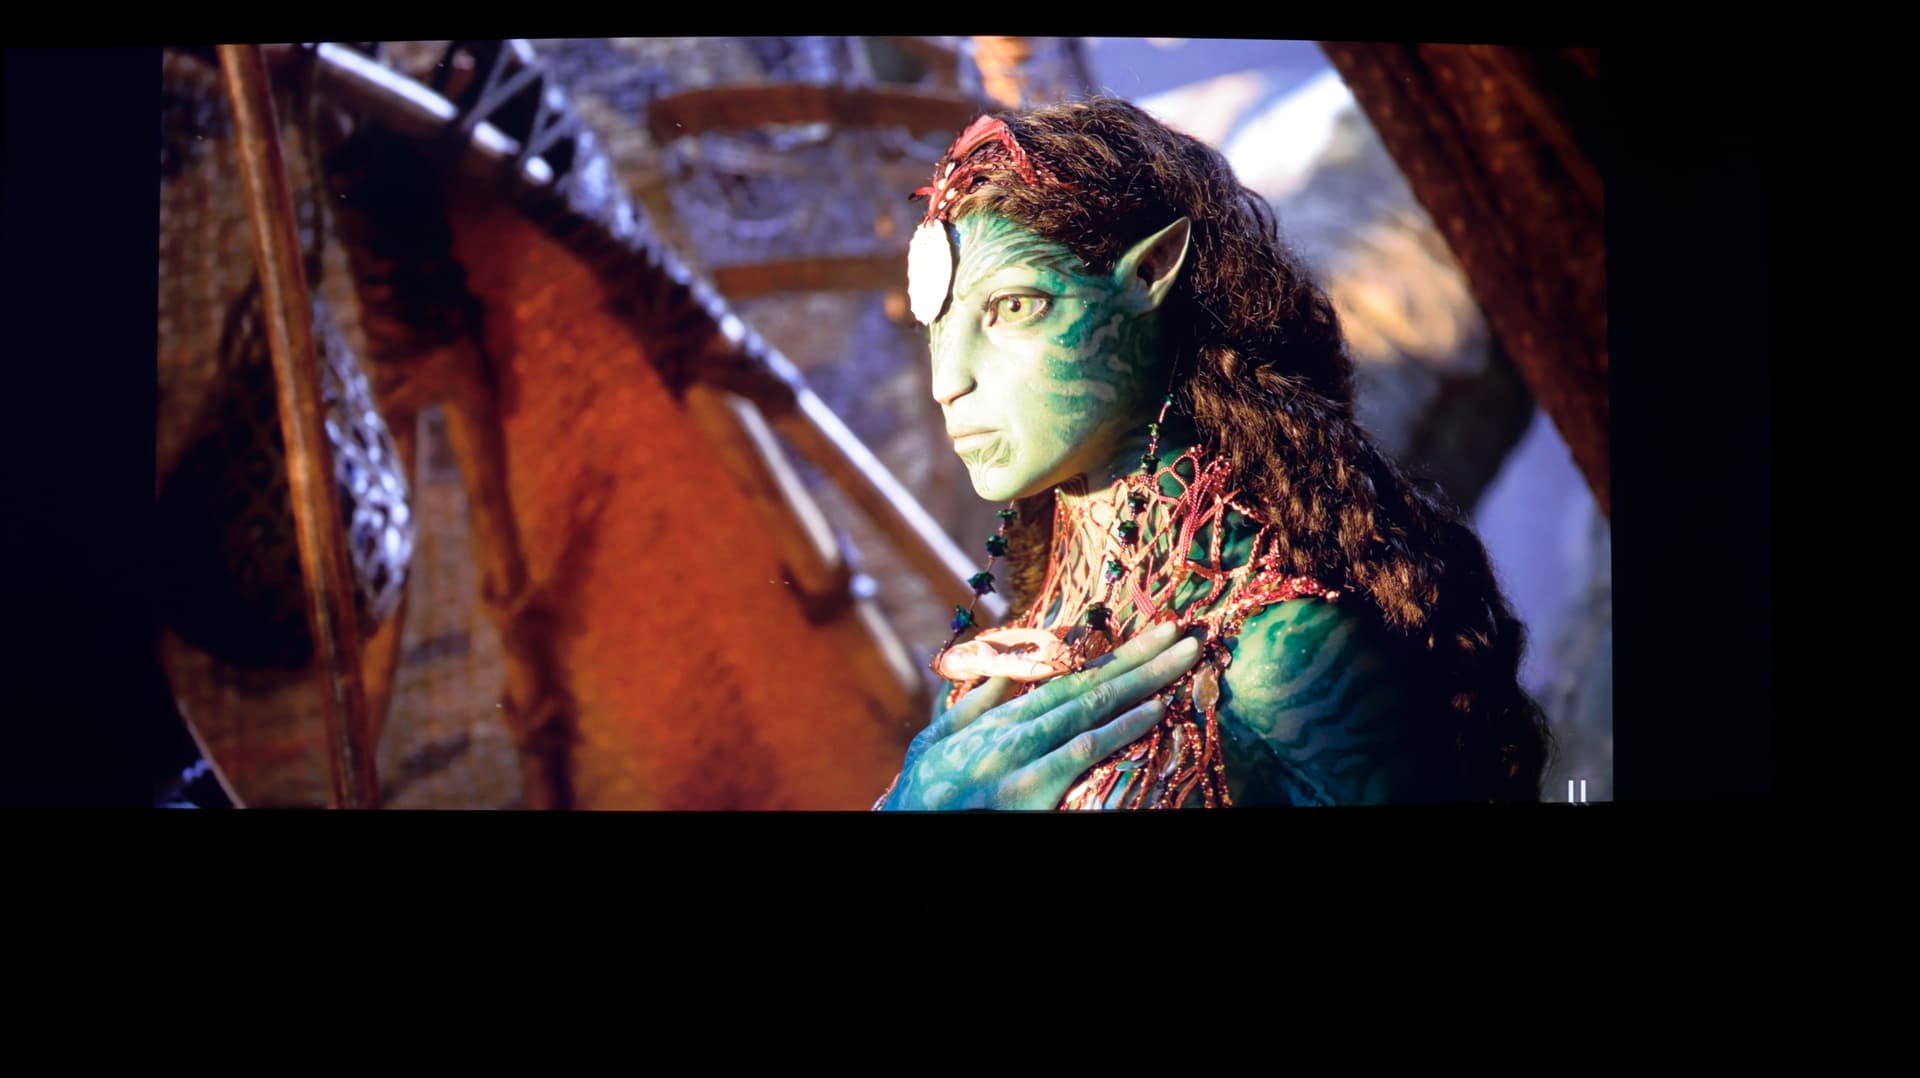
From the slice of orange scene, Frame Adapt cannot keep up with Lumagen at all. All that detail is lost
Completely agree and this is exactly what I notice with my LG projector and MadVR. SDR2020 is the way to go for projectors if you have a video processor. IMHO, autocal in HDR is still not there yet, whereas autocal in SDR can be considered excellent. For Calman, SDR can be calibrated by computing a 17pt 3D LUT that requires 4,913 measurement patches. In contrast, Calman’s HDR calibration uses just 5 patches for its Matrix LUT so is no where as accurate.
For an OLED, one might still want to use a less accurate HDR calibration because OLEDs can handle up to 1,500 nits, but its no point for projectors, which barely give 100 calibrated nits. Just go for SDR, but ensure that the projector is calibrated to SDR2020 and get the processor to output SDR2020, otherwise you miss the additional 10 bit colors.
Not sure if its the camera, but the greens look different with Lumagen having a more blue tone.
Otherwise, Lumagen handles the highlights better with frame adapt blowing out on the face. However, Frame Adapt has more details in the hair, whereas on Lumagen the area behind her ear is completely black.
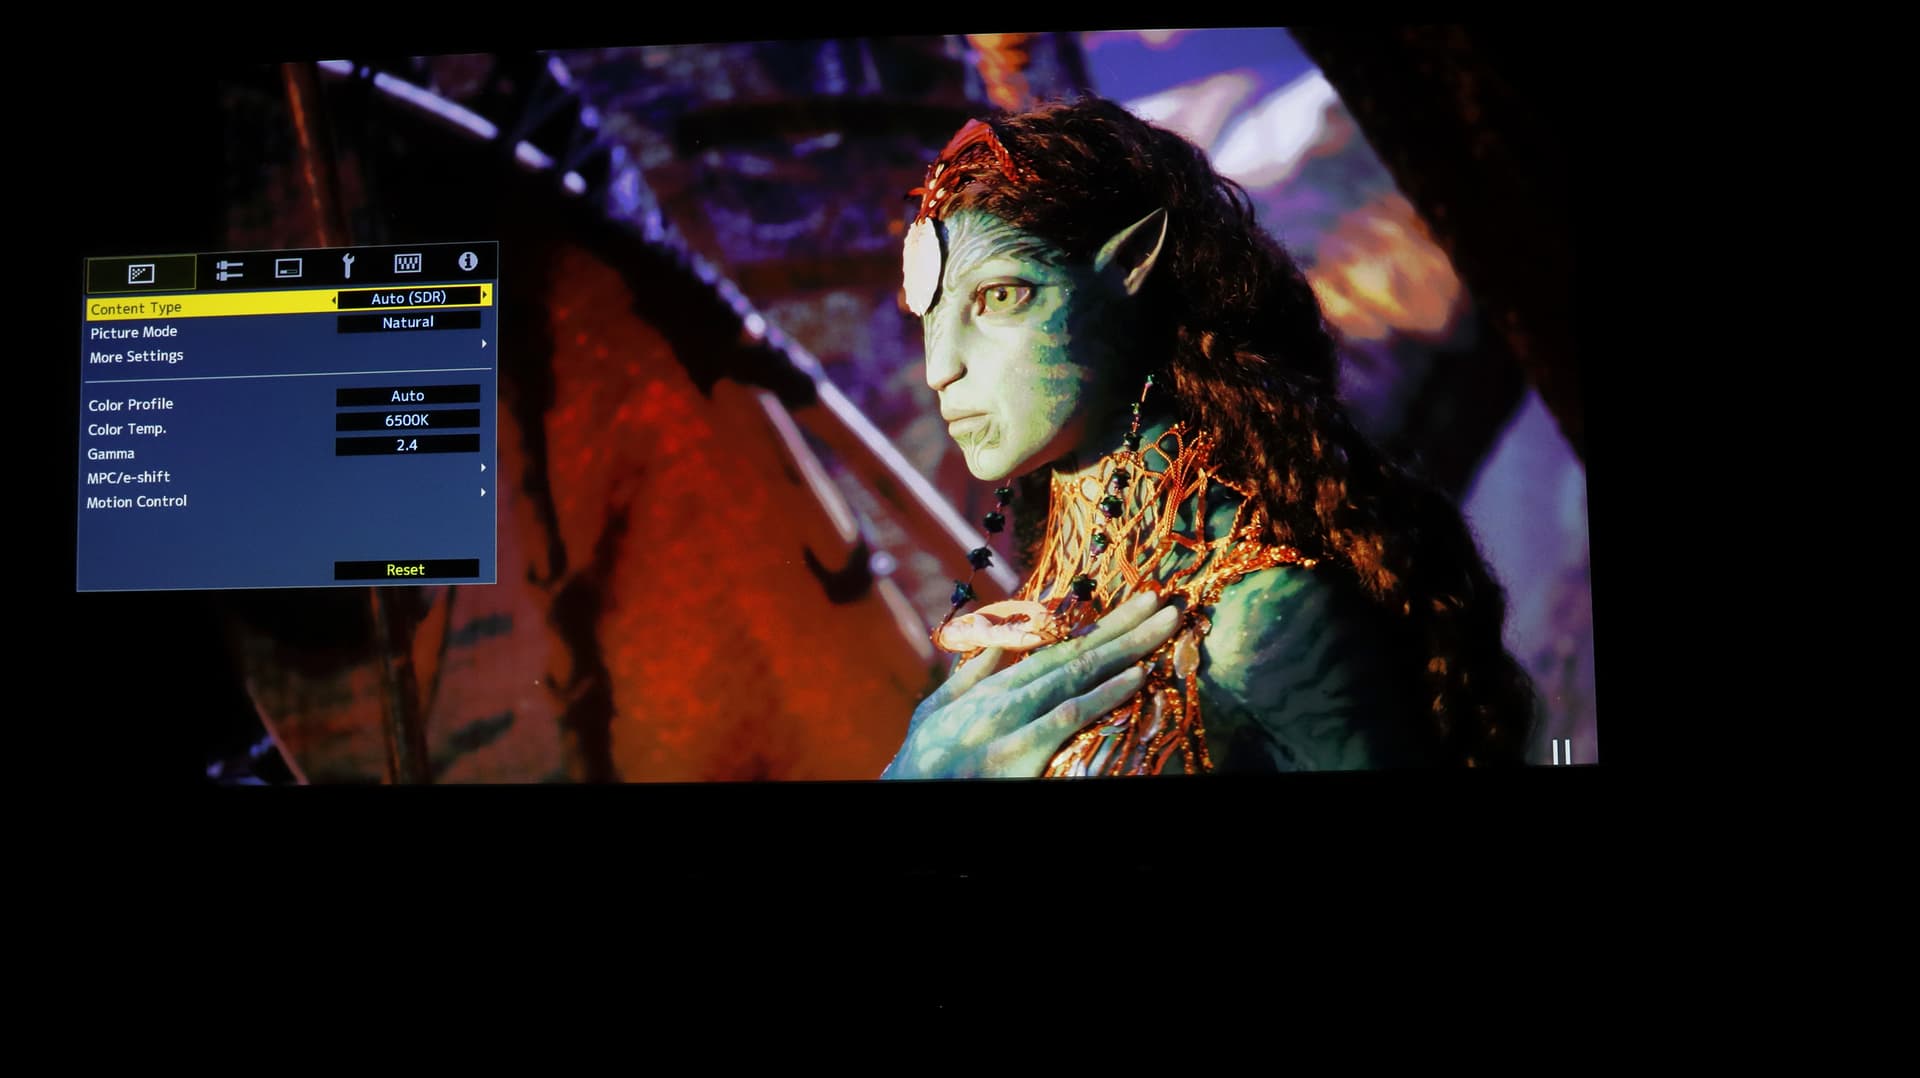
Could it be due to the HDR Quantizer setting. I noticed here that you have HDR Quantizer on Auto. For this scene, could you try it on Auto (wide) and some of the other -2 to 2 settings to see the differences? One of the great things about Lumagen and MadVR is that you can usually just set it and forget it, instead of having to fiddle with a control for the best tone mapping.
looking at the background behind the woman creature, the lumagen is “Purplish”
jvc is just “Au Natural White”
Here’s the same scene using Lumagen RP with my Sony VW870/955ES.
Compare the above with the Lumagen RP + JVC NZ7.
The Sony is better at reproducing shadow details and the colors imo are also more accurate. The JVC wins in “perceived contrast” due to its ability to modulate the laser illumination which ultimately gives the impression there is a color shift but in reality, it is pretty close. I discovered that JVC’s colors at Gamma 2.4 in SDR BT2020 colorimetry always have a more “yellowish” tone. Partly attributed to the use of Bluescent laser by JVC where the blue laser will be split into “yellow” phosphor and green and combined at the last stage to display “white”. This is different from Sony’s laser implementation. I preferred Sony colors in bright scenes over the JVC as it looks more natural and the image is so much sharper and replete with details. Just look at the hair strands from Sony, it scary good.
1 Like
Oh boy! Pls let me know which weekend you free for me to visit!
Calibration – SDR & HDR
I’m using both JVC proprietary Autocal s/w and Chromapure s/w for my NZ7 calibration. When used in conjunction with a Lumagen Radiance Pro, I have to set the gamma to 2.4 as a pre-requisite for a more accurate EOTF (gamma) tracking when playing HDR content.
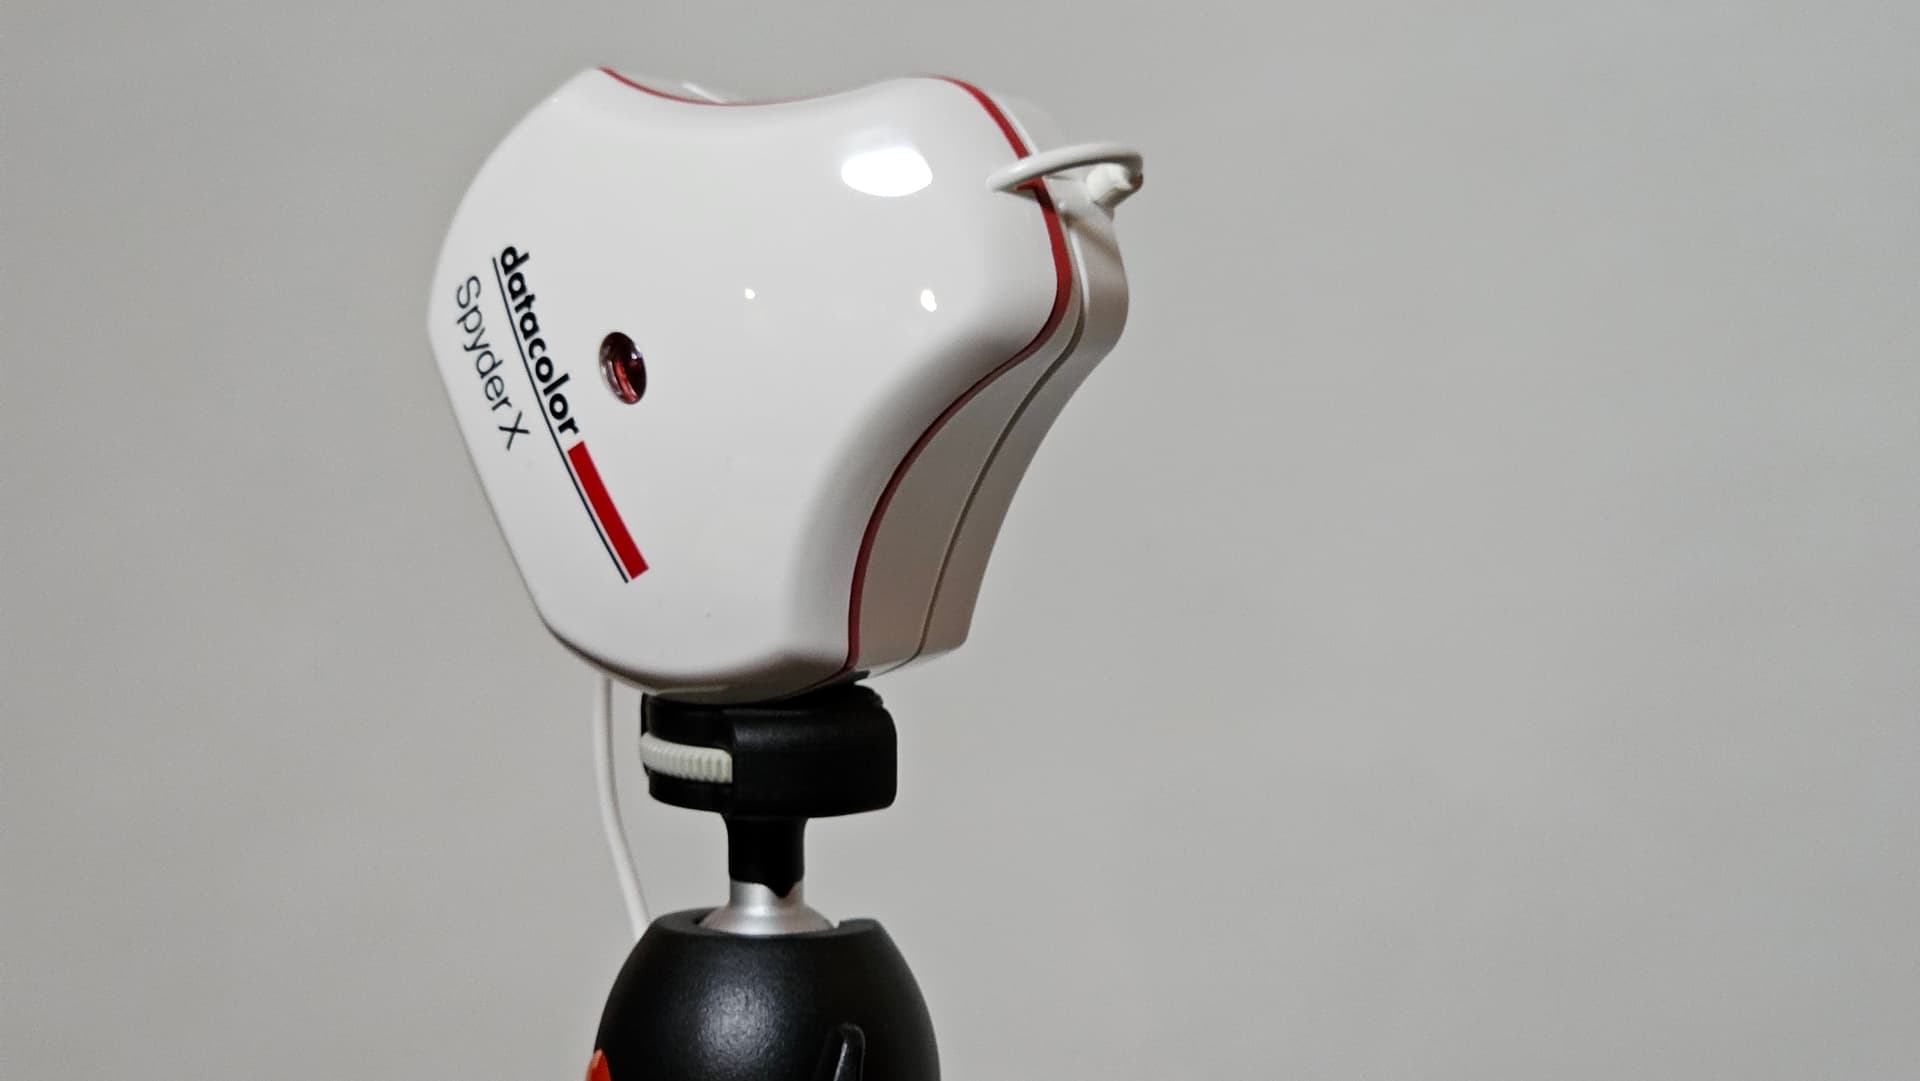
I’m not a professional calibrator, hence I only use COTS colorimeters like xrite iDisplay 3 Pro for use with Chromapure and a SpyderX Pro Elite (much better built-in sensor graded for projector calibration according to Spyder).
Out-of-the-box colors are not that accurate and definitely required calibration. It took me nearly 1.5 hrs to complete the basic SDR 709 calibration as I need to fiddle with different settings such as white points (RGB), gamma (Y luminance value) and lastly the colors – i.e. Primaries (RGB) and the Secondaries (CMY) aka the chromaticity (xy values). As for JVC Autocal, I have less control as it is meant to be “automated”. The s/w will take over the control from the user and all I need to do is to wait for the results as it went through the process of dialing in the colors and gamma to conform to the SDR BT 709 and HDR 10 BT 2020 modes.

Surprisingly, the results of both calibration s/w were not too far apart. In fact, I find the JVC Autocal did a much better job of dialing in the gamma as close to 2.4 compared to Chromapure. As gamma affects the overall white points (RGB), it is important to get it right. After trying and deciding which of the 2 calibration s/w to use, I ended up with JVC Autocal due to its excellent gamma correction. Since I am going to use JVC Autocal values, I have to reset all the CMS values on my Lumagen Radiance Pro. Yes, what a waste for nearly 1.5hrs of manual calibration but it is a necessary move nonetheless.
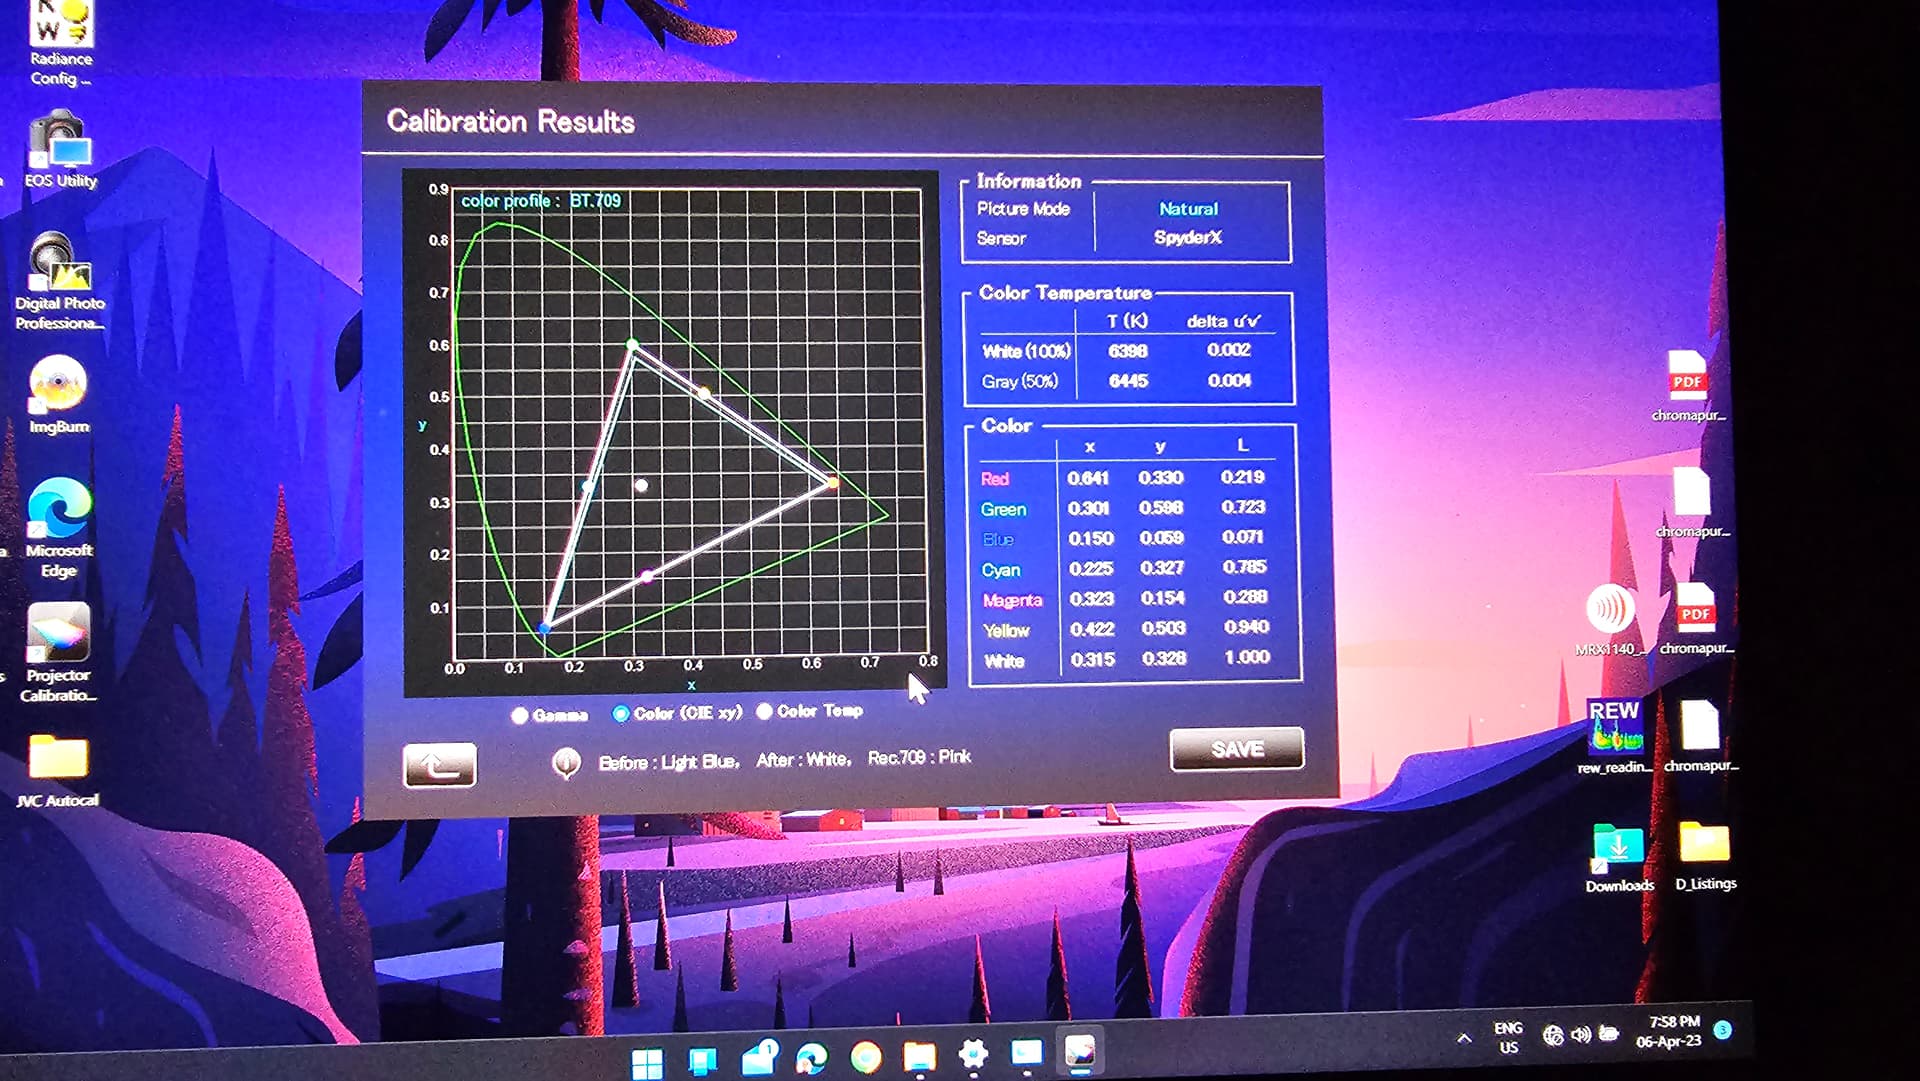
The JVC Autocal shows a slightly cooler color temp at 6,398K and a grayscale temp of 6,445K at a 50% luminance level. For the chromaticity (xy,Y) which measures the RGBCMY and White tracked nicely near the reference values. Although JVC Autocal does not show the Delta E, the Chromapure did show me the Delta E for the colors to be around an average of 1.81 overall for SDR BT 709 which is excellent IMO. I am unable to do an HDR calibration using Chrompaure even if I use 75% saturation, hence I am unable to provide a Delta E value for HDR BT 2020. Sorry folks.
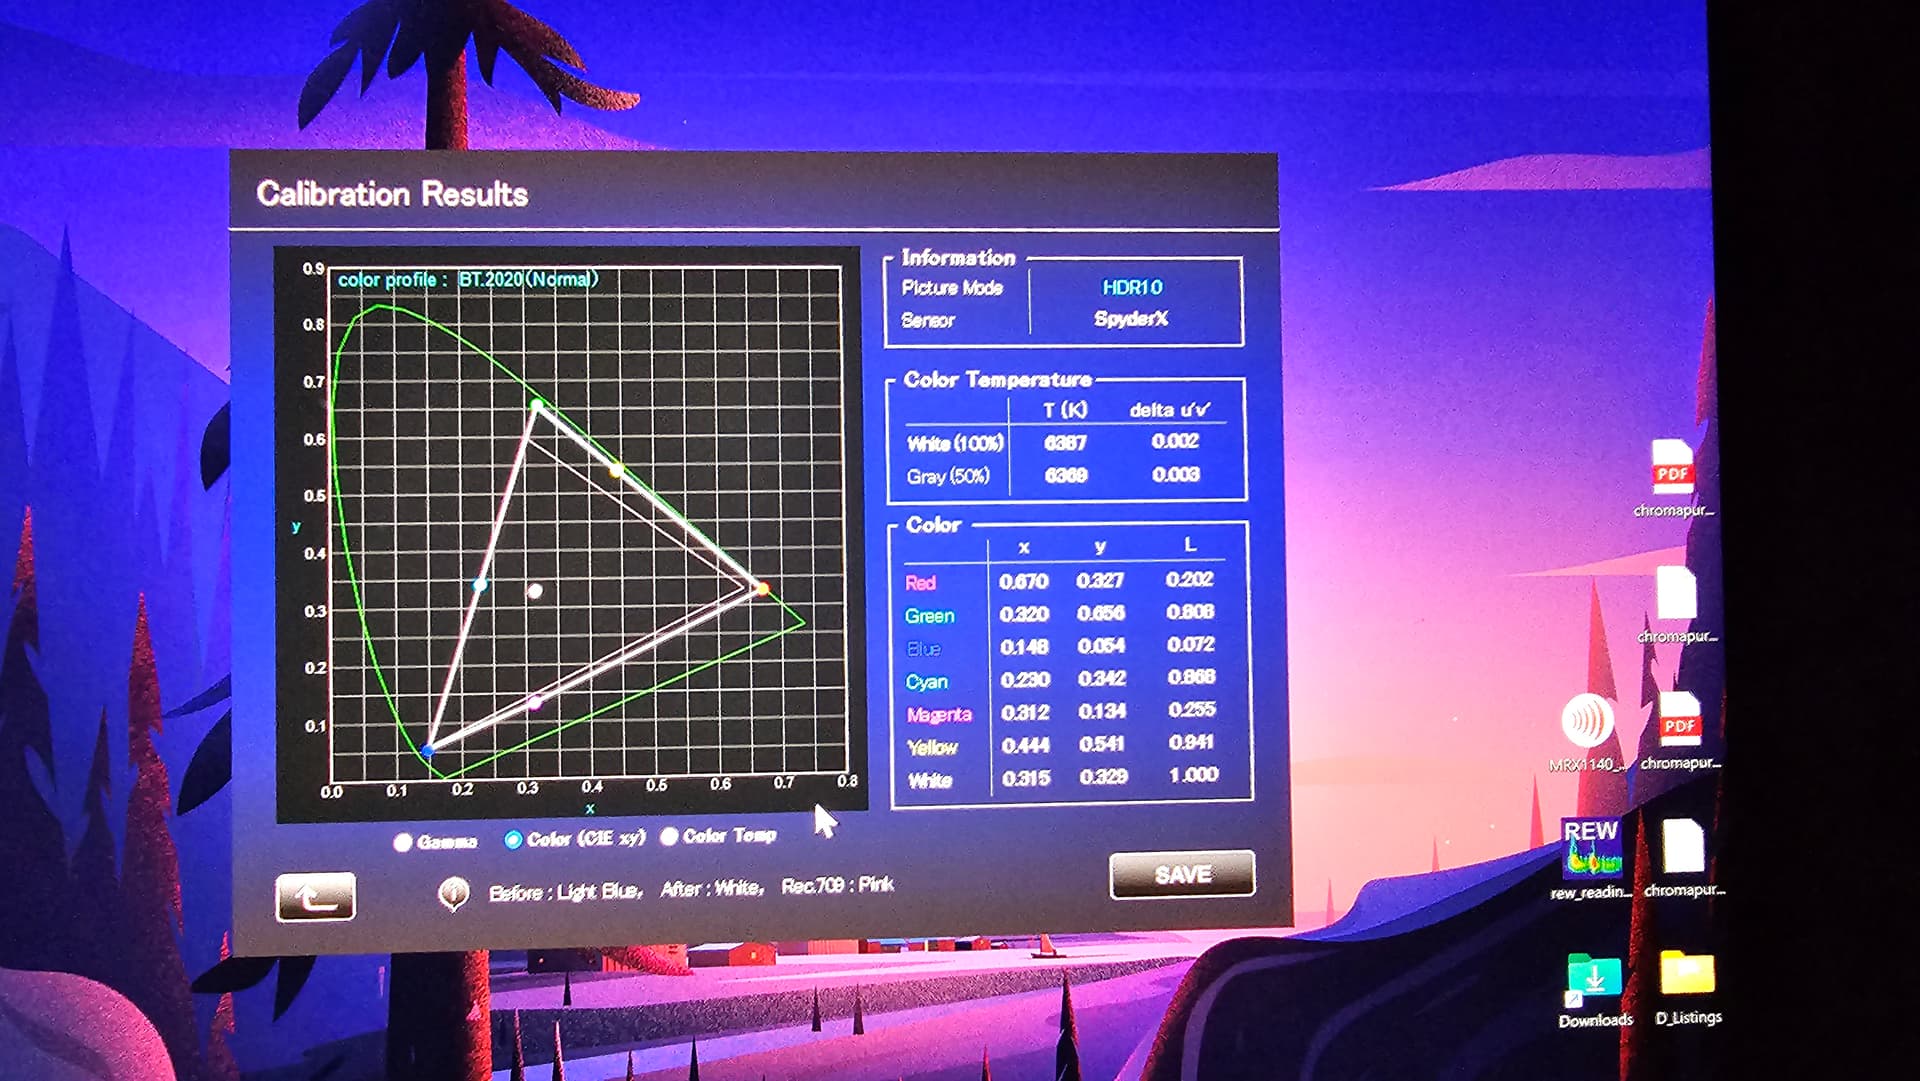
Using JVC Autocal for HDR 10 calibration, I am able to get some pretty excellent results and that is assuming the values churned out by the s/w are indeed correct. Sadly, I am unable to confirm any of those values using Chromapure. FWIW, here is a look at the post-calibration results for HDR 10 (BT 2020 - Normal).
Normal vs Wide gamut and Color Filter
One might come across the terms, Normal BT 2020 and Wide BT 2020. For the latter, only the higher-end models like NZ8 and NZ9 will have what we called a color filter that will be used to expand the color gamut to cover 100% DCI-P3 colorimetry. This so-called color filter comes with a trade-off – i.e. a significant loss in light output by as much as 25% - 30%! That is about one-third of the light output gone if the user wishes for the NZ8 and NZ9 to reproduce “more colors”. If you ask me whether it is worth it? I will say ABSOLUTELY NOT! I did some comparison on the NZ7 and NZ8 (forget about NZ9 since that is a different league altogether) with the calibration results from other NZ8 owners and I found that the Y luminance values which depict the amount of “brightness” output when viewed at a normal distance are almost negligible at a mere 8% difference in brightness between the 2 models.
NZ8 user calibration (wide color)
NZ8 user calibration (normal color)
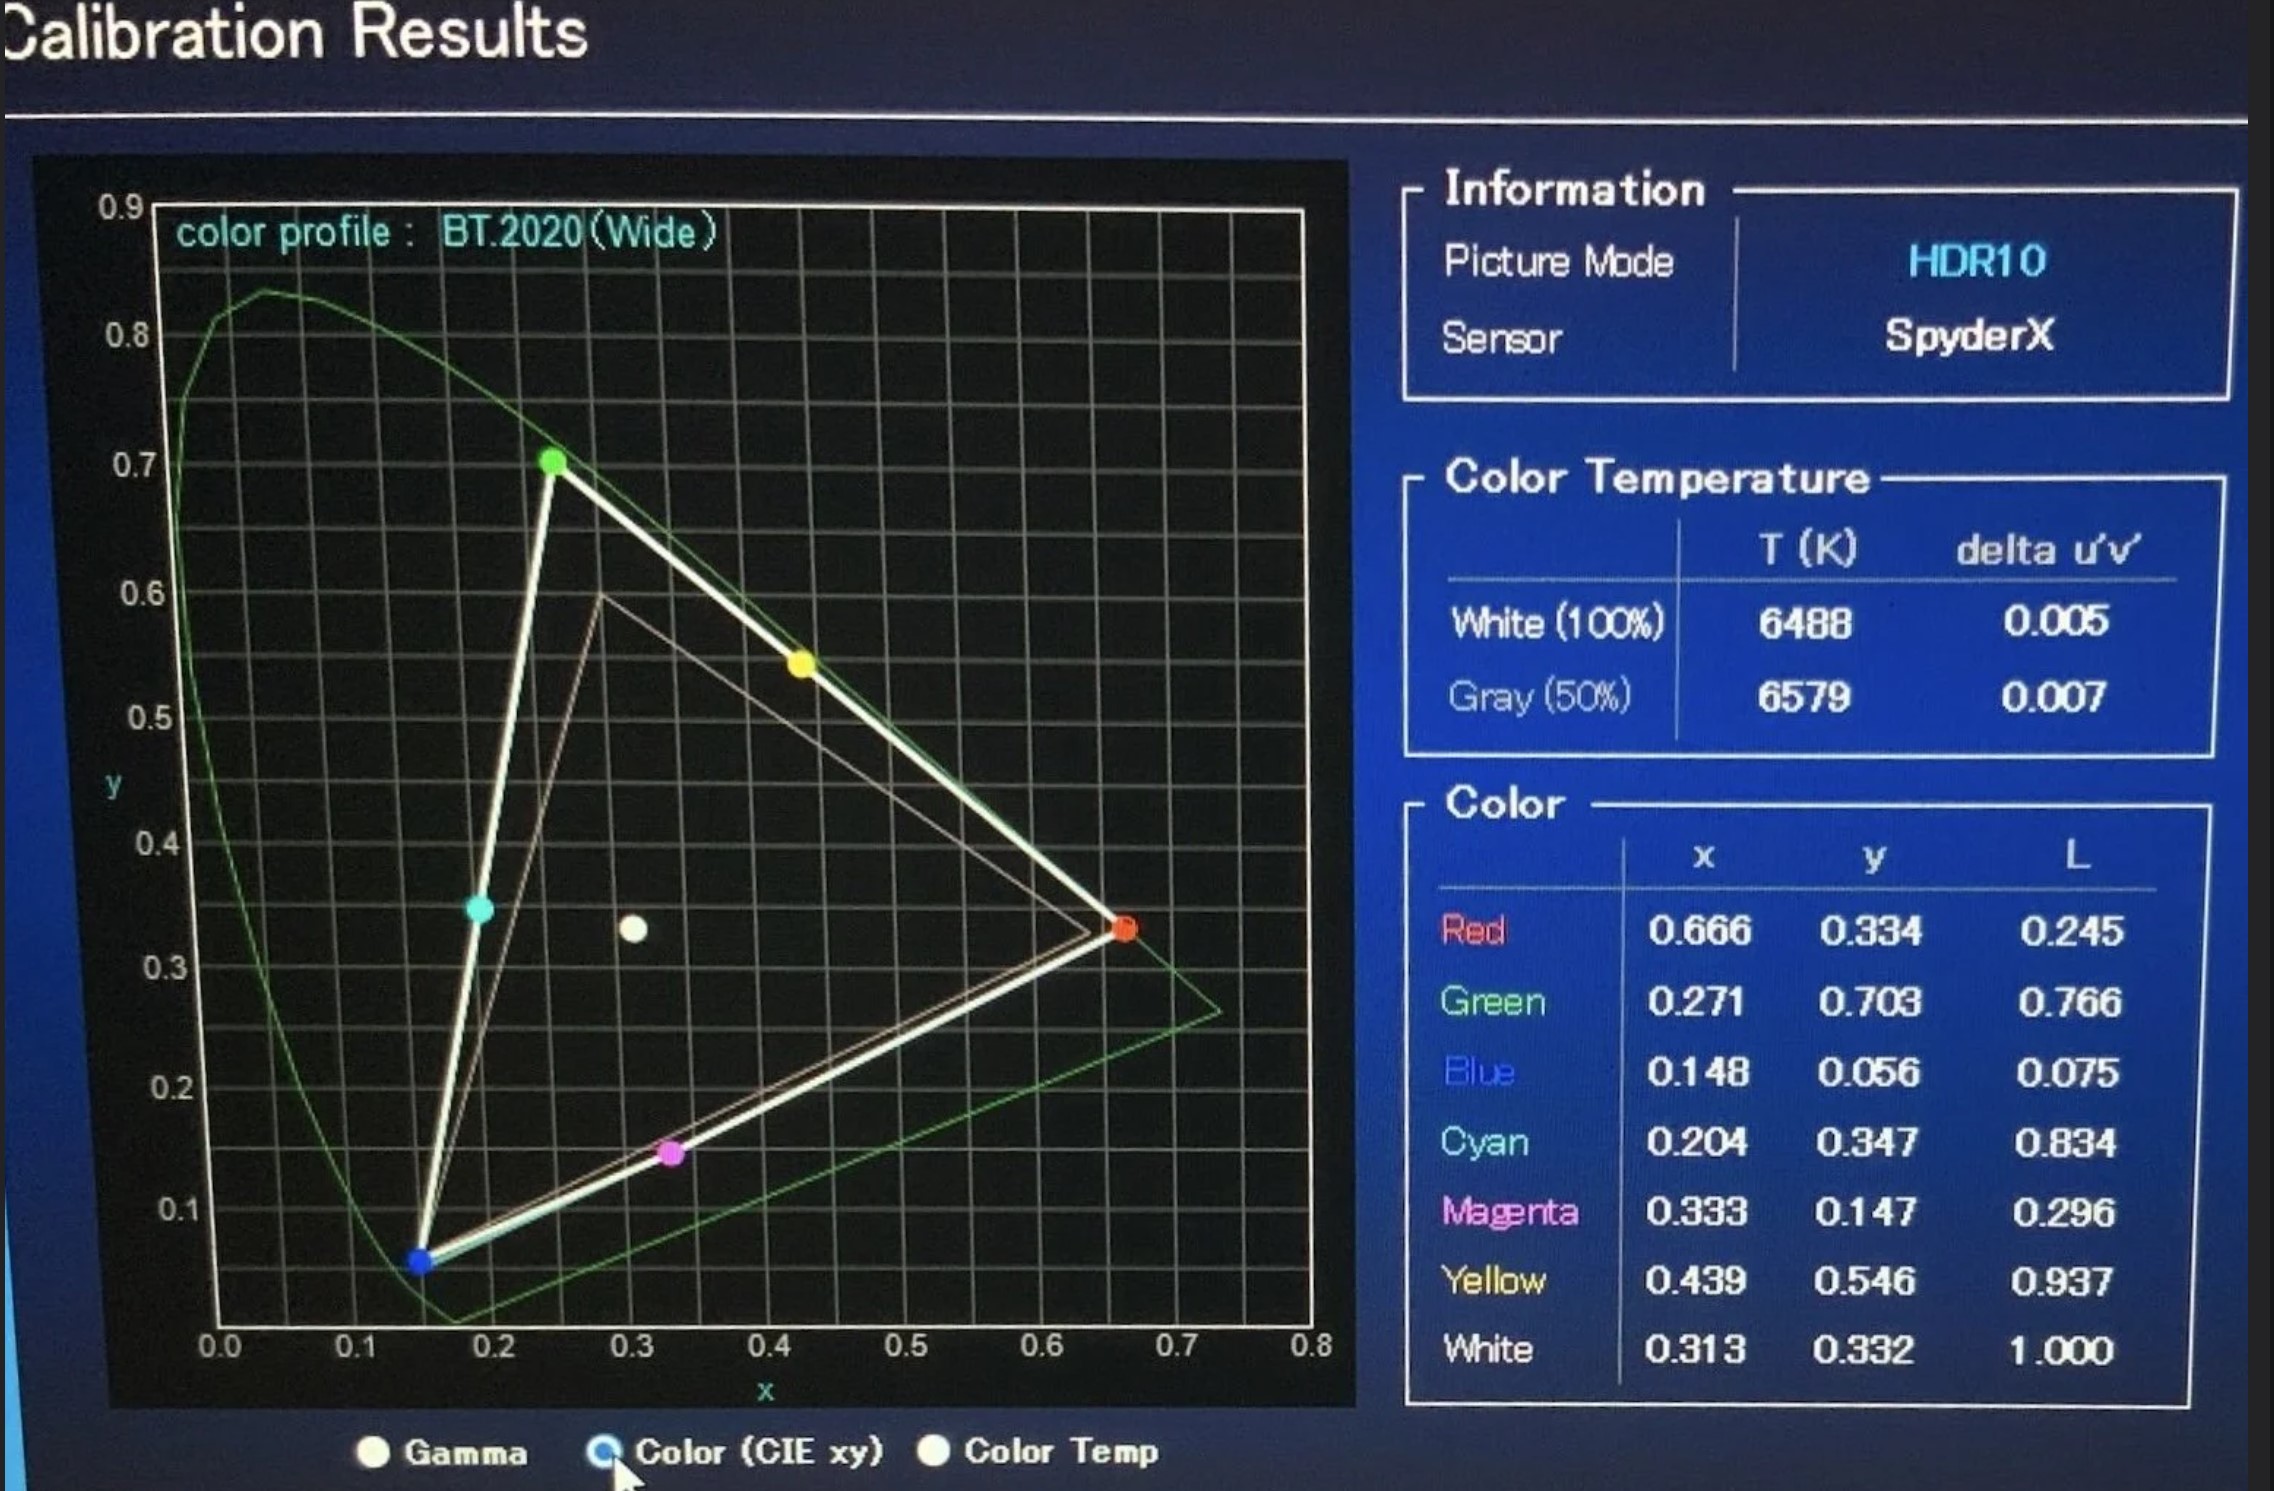
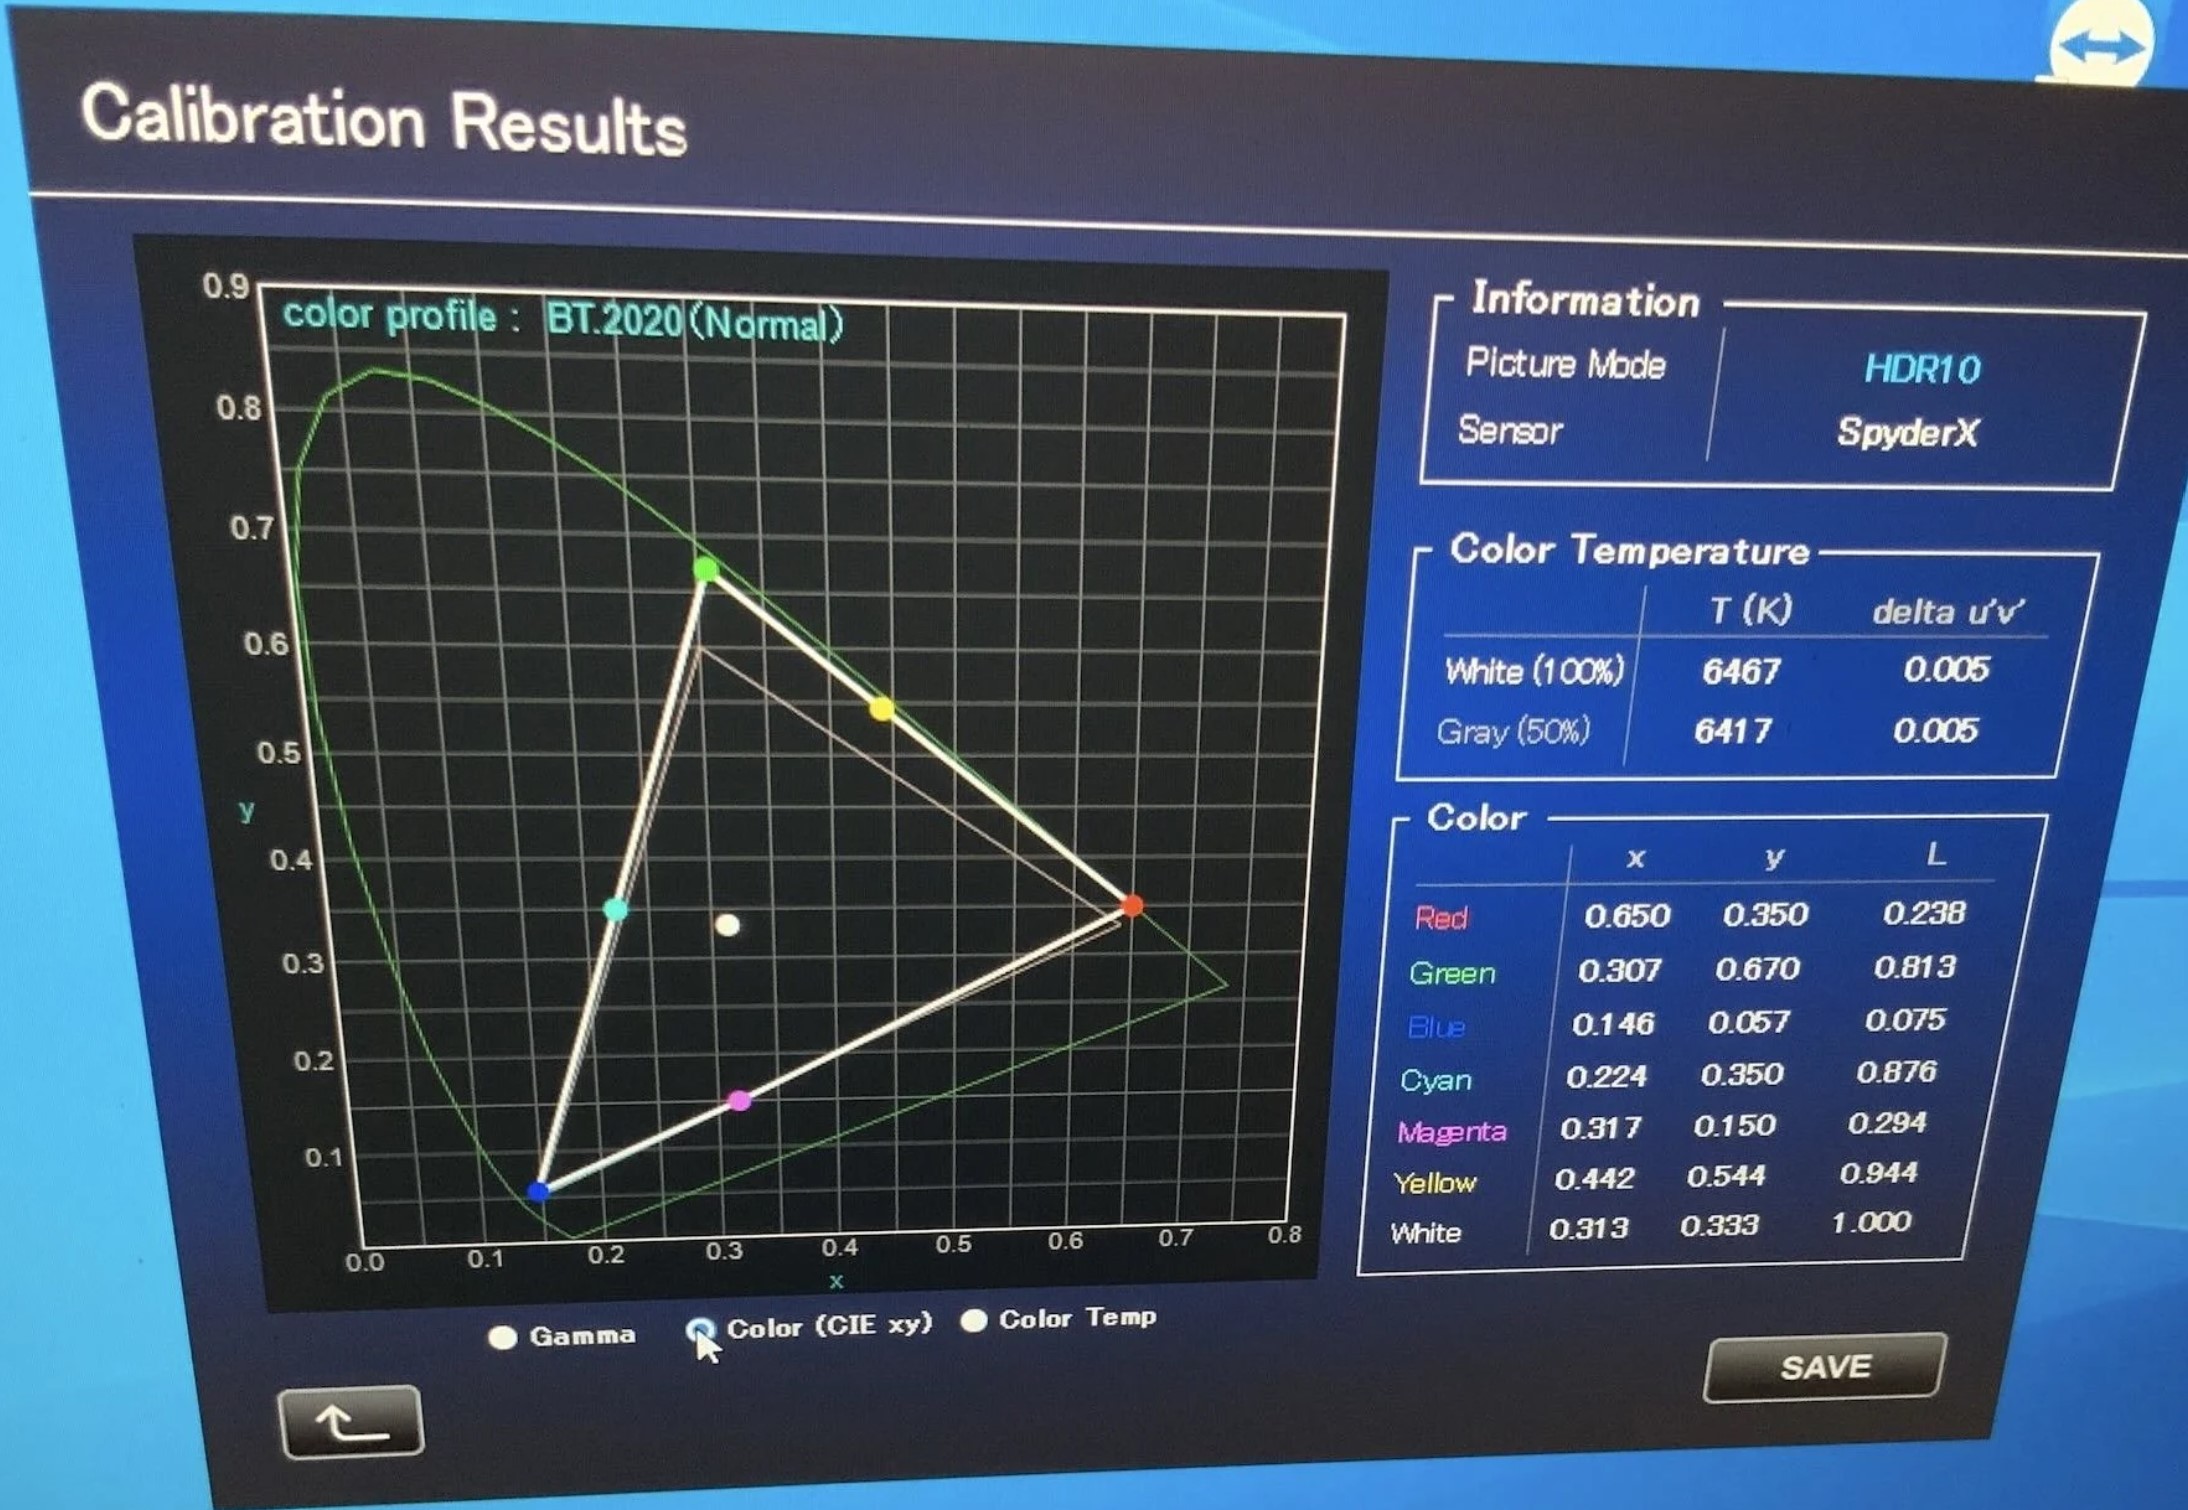
With the color filter activated on NZ8, there is a significant drop in luminance output which makes NZ7 comparatively brighter than NZ8! An NZ8 user should never ever feel the need to use the color filter just to see “more colors” which probably is not found in the content in the first place. More often than not, there is really NO NEED to activate the color filter for the JVC projector as this is a big downside of the way JVC implements a wider color gamut. Unlike Sony which did a fantastic job in achieving DCI-P3 colors at 93% (if my memory serves me well) without any significant loss in light output. To put it bluntly, JVC failed miserably in this so-called wide-color gamut implementation. This has been the biggest drawback when I first review the NX7 that comes with the color filter.
I really hope JVC can improve in the R&D for a wide color gamut for future iterations, else might as well drop this feature entirely since very few users are ever going to use it as the overall PQ, especially since the contrast will take a hit. Lest we forget, JVC is tauted as the “King of Contrast” in the home theatre projector community for the longest time and this is not doing JVC any favors.
NZ7 or NZ8, which is a better deal?
Initially, I am all zone-in for the NZ8 at the MSRP of $24,999 but there is no stock in Singapore. The NZ8 model has been regarded as the value-for-money projector to get vis-a-vis the price-to-performance ratio. In the projector realm, there is this “diminishing of returns” as one goes higher up in the series. The difference between the NZ7 and NZ8 is nearly $10K difference but surprisingly, there are more similar than dissimilar in terms of performance. Granted, the advertised native contrast ratio for NZ8 is rated at 80,000:1 while it is half of that for NZ7 (at 40,000:1). However when it comes to contrast ratio, it is only part of the story as we need to look at the viewing environment one is in. In theory, a native contrast ratio of 3,000:1 or higher is considered a very good home theatre projector capable of resolving details but when viewing condition is not ideal like having white walls and light spillage from the windows will affect the overall perceived contrast ratio. This will ultimately make the overall PQ worse. A calibrated projector will almost always have a lower native contrast ratio after calibration but as long as the value did not fall too drastically, the NZ7 and NZ8 image quality is almost indistinguishable from a normal viewing distance. Let’s not forget that the size of the screen will also affect the amount of light output it can retain – e.g. a bigger screen with a bigger zoom ratio will impact the overall brightness of the picture, resulting in poor perceived contrast compared to a smaller screen size. The advertised lumens output for NZ7 is rated at 2,200 while the NZ8 is rated at 2,500. The light output does not make a huge difference. If you have a deeper pocket and stock is available, NZ8 is a clear choice but otherwise, NZ7 is something you can look at with very little compromise IMO. Most definitely not a $10K improvement between NZ7 and NZ8. Save some money to buy yourself a better screen or get a Lumagen Radiance Pro for Dynamic Tone Mapping which IMO is way better than JVC’s Frame Adapt HDR.
In the next post, I will talk about the pros and cons of the new laser dimming (LD) feature for the NZ series and also touch on some of the options avails to users and how some of these settings will affect the PQ. Stay tuned.
2 Likes
Today, I just did another round of calibration and decided to combine the best of both worlds. If anyone own 2 calibration s/w (Chromapure & JVC AutoCal) like I do. The following order is the way to go after several hours of calibration to get the best grayscale, gamma and colours (RGBCMY).
Step 1: Calibrate the JVC projector using the “JVC AutoCal + SpyderX Pro Elite” combo to get a baseline for the gamma and the colours. If you are not satisfied like I do, particularly the Color Temp (CCT) inclined towards a “bluish” tone. You can use Chromapure to fix the CCT. If your projector happens to stick the landing at 6500K thereabouts, then you are one lucky chap. Do note that not all projector will exhibit the same kind of calibration results. There are some variations in certain batches.
Step 2: Use Chromapure to fix the CCT problem which can be quite apparent in brighter scene. Without going into the technical stuff, suffice to say that the difference in the colorimeter used (in this the write iDisplay 3 Pro has much more accuracy reading colours compared to the SpyderX Pro Elite which is much better at correcting gamma. Perform an autocal process using the Lumagen Radiance Pro as the test pattern generator. The CCT reading should improve from 6,300K-ish (slightly warmer tone) to around 6,488K in my case… This is a significant improvement.
1 Like
For color, u need to use i1pro2 for best accuracy as it has a sensor plate to get base 6500 b4 calbration. All spyder or X has inherent error of 5 to 8% due to mass production. Refer to avsforum on jvc autocal
2 Likes
For all iris 0 to -14, u need to do 4 sets of color calibration.
1 Like
I read that you can replace certain DLLs in JVC Autocal so that it works with the Xrites & Calibrites
Both sony and jvc use blue laser + phosphor designs for their light sources, with the exception of the gtz380 which has a rbb laser-phosphor design.
sony ‘z-phosphor’ Z-PHOSPHOR LASER LIGHT SOURCE - Projector Reviews
jvc ‘blu-escent’ http://pro.jvc.com/pro/attributes/PRESENT/brochure/JPC_DLA-VS2300-VS2500_white_paper.pdf
because of this the sony (except gtz380) and jvc models (filter not used) all have fairly similar gamut coverage which you can see in the avforums reviews:
JVC DLA-NZ7 Native 4K Laser D-ILA Projector Review | AVForums
JVC DLA-NZ8 4K Laser Projector Review | AVForums
Sony VPL-XW7000ES Native 4K SXRD Laser Projector Review | AVForums
The high light cost of using the colour filter is caused by the phosphor’s contribution to the shape of the light source’s spectrum so sony would face the same problem if they added a filter too (the nx series filter eats roughly 15%, alot less than the nz filter). Sony does have an immediate (proper) solution in their rbb design which gets full p3 coverage without a filter and which sony already uses in the gtz380 released in 2021, but they did not/could not scale it down for their 2022 xw series…
A great summary (including example pictures) of the jvc nz ‘slightly-yellowish after autocal’ issue is here
https://www.avsforum.com/threads/official-jvc-autocal-v13-thread-dla-25ltd-nz7-nz8-nz9-np5-rs2100-rs3100-rs4100.3236991/page-36#post-62159391
A summary of the summary is that some form of it is likely unavoidable, but it’s made much less obvious by using 10% window-size patterns to adjust 100% white balance with the rgb gain controls after colour autocal. Profile off with 3dlut, also with 10% size patterns is of course another option.
A more interesting comparison to make between your sony and jvc is image sharpness. The sony 870 has the upper-end arc-f lens but the nz7 only has their standard 65mm lens. Both sony and jvc charge alot (to put it mildly…) to move to the top end models with one of the major selling points being that lens upgrade. How much benefit is there for video content that has a softer presentation, either by artistic choice (eg going for a film-like look) or by not having the effects budget of avatar (many many films with a 2k DI)?
1 Like
Thanks for the tip. Can point me to that specific post in the AVSForum will be great.
Agreed SpyderX Pro Elite is not the best colorimeter for measuring color accuracy. I hope JVC will support more probes in tge future. The Autocal s/w itself is fine espcially their 33 gamma tracking is pretty rock solid based on my observation for almost one week of calibration trial and error cycling between Chromapure and Autocal.
Yes. Im aware of that. It goes in steps of 4-clicks one stop. Every click in aperture will change the colors and a distinct color shift will manifest itself. This will never happen in my Sony. When calibrating, i always stick to full aperture opening and restrict to -3 to prevent that. This is drawback of JVC projector which has been inherent in their previous generation as well but I thought the new NZ series will not have this issue but alas, still the same. I’m looking to rely less on DI and more on LD for this new model. Testing mode 1,2 & 3 to find the best one to settle with my aperture at -3 for the moment. I still havent come to a conclusion.
I didnt know that. If truly the case, that will be great. It is not as simple as supporting any type of colorimeter imo but also to be able to load the calibration meter file to base its calibration results against a reference, just like Umik 1 from miniDSP.
Thanks Mark for the wealth of information ![]() from the AVSForum source. There is simply too much info out there in AVSForum for me to follow but your post zoning in on specific segments will help me alot to understand better about the idiosyncrasies of the JVC projectcor even better.
from the AVSForum source. There is simply too much info out there in AVSForum for me to follow but your post zoning in on specific segments will help me alot to understand better about the idiosyncrasies of the JVC projectcor even better.
I really miss the overall sharpness of the ARC-F lens of my Sony which is truly way better in resolving the finer details sharper details compared to the 65mm all glass len array of JVC. Dont get me wrong, JVC NZ7 len is very good but definitely not in the same league as tge Sony.
Here is the AVSForum thread
1 Like
@Desray, dos the NZ7 still have the Panasonic UHD specific picture modes called Pana_PQ_HL. Was always wondering how well it worked. Requires a UB-9000 or UB-820.
Yes, those are still present in the NZ series.
This is the part I didn’t know until quite recently… lol… if I had read this post earlier would have taken note… now then I’m checking out this review