HT session with Wind

20,000hrs is estimated shelf life for laser diode…even if the laser can last that long, the hardware probably not. Let’s not forget that the polarizer and the PCB boards are not rated and will definitely not going to last beyond say 5 yrs. So I will tamper my expectations when it comes to this 20,000hrs lifespan which can last more than a decade even if we watch for 8hrs per day. For the LG, at $5.8K, I think it is very well priced for a laser projector if it can last for 7 - 8y yrs before up the lorry.

1 Like

Exactly my thoughts. I have actually factored it to have a 5 year depreciation and at $6k, that translates to $1.2k a year. That’s $100/month, 5 years up lorry then its breakeven.

Anything more than 5 years , is a bonus. Selling it at the 4th year at $1.5k, that’s good enough to trade in for another new model come 2025.

And don’t have to worry about changing bulp etc

Coming in at $100/ month, it is really value for money for the quality. Cannot ask for more

1 Like

Initially my Mrs disapproved on the purchase, now whole family is watching on a screen bigger than the TV. Practically on more than 5 hours, one movie after another.

I know she is enjoying because she actually watches the movie instead of browsing her phone :muscle:

Nice colours really! I can’t even imagine after calibration!!

“Next Gen” on Netflix, picture below using warm temp setting.

2 Likes

“Home” theatre definitely brings family “closer”.

3 Likes

Hhmmm, I would expect more than 5yrs of usage (assuming the laser held up) if I based on my old JVC lamp based pj;

That one lasted almost 10yrs, I cycle thru 4 lamps b4 the power supply gave up and JVC advised that no spare parts as it’s a discontinued model.

Would loved to see the PQ… laser shud become the std in a couple more yrs as prices continue to trend down.

1 Like

Sooo, it’s been a while since the pj update… and while waiting for a new official release for this prj workflow from calman, I’ve spent time playing with loading of BEQ into both of my Minidsp 2x4hd using a raspberry pi as compared to using remote, laptop ezbeq software, and WiDg.

The benefit is faster loading time, direct search movie and load, and no need to merge files first before loading in to Minidsp using laptop.

I’ve been doing some trial and error for some time to ensure stability using RPi3 as compared to RPi4. So far so good on the RPi4 since I experience hanging of software in the RPi3 and till date still not sure why, but I’ve moved on and gotten the RPi4 instead due to its speed and less loading time using a M.2 SSD

I think majority of us already know what is beq and what is does. In nutshell is to restore bass Freq on the lower Hz region in movie.

If you have a Minidsp, it will be fun to give it a try. Of course with caution. Thanks to bro Ronlidoq for the poison that embark majority of us here into this beq journey :clinking_glasses: lol

So to start, you will need the following (for ease of building one, we will use SD card instead)

  1. RPi 4
  2. Case
  3. SD card. 16GB will do
  4. Pc or laptop with SD card reader or simply get a SD card reader / writer

Download the RPi imager here for Windows

And follow the instruction here to “burn” the raspbian OS Into SD card

Insert the SD card into the Pi4 and run raspbian OS. You will need to connect a HDMI cable to TV, a mouse and KB. Using a Bluetooth dongle and wireless KBM is also desirable

Update the OS first by using terminal window and type
sudo apt-get update
sudo apt full-upgrade

After you’ve updated the OS, follow the instruction below to install ezbeq into your pi
https://ezbeq.readthedocs.io/en/latest/rpi/

Guess what…You are done!

What you can do after following the instructions and installed ezbeq is

  1. Connect the Pi4 usb port to your minidsp2x4HD

  2. Go to your browser and type in your Pi4 IP address. It’s preferred to static your Pi4 IP address

Once you punched in your Pi IP address in the browser, You will be seeing the below screenshot


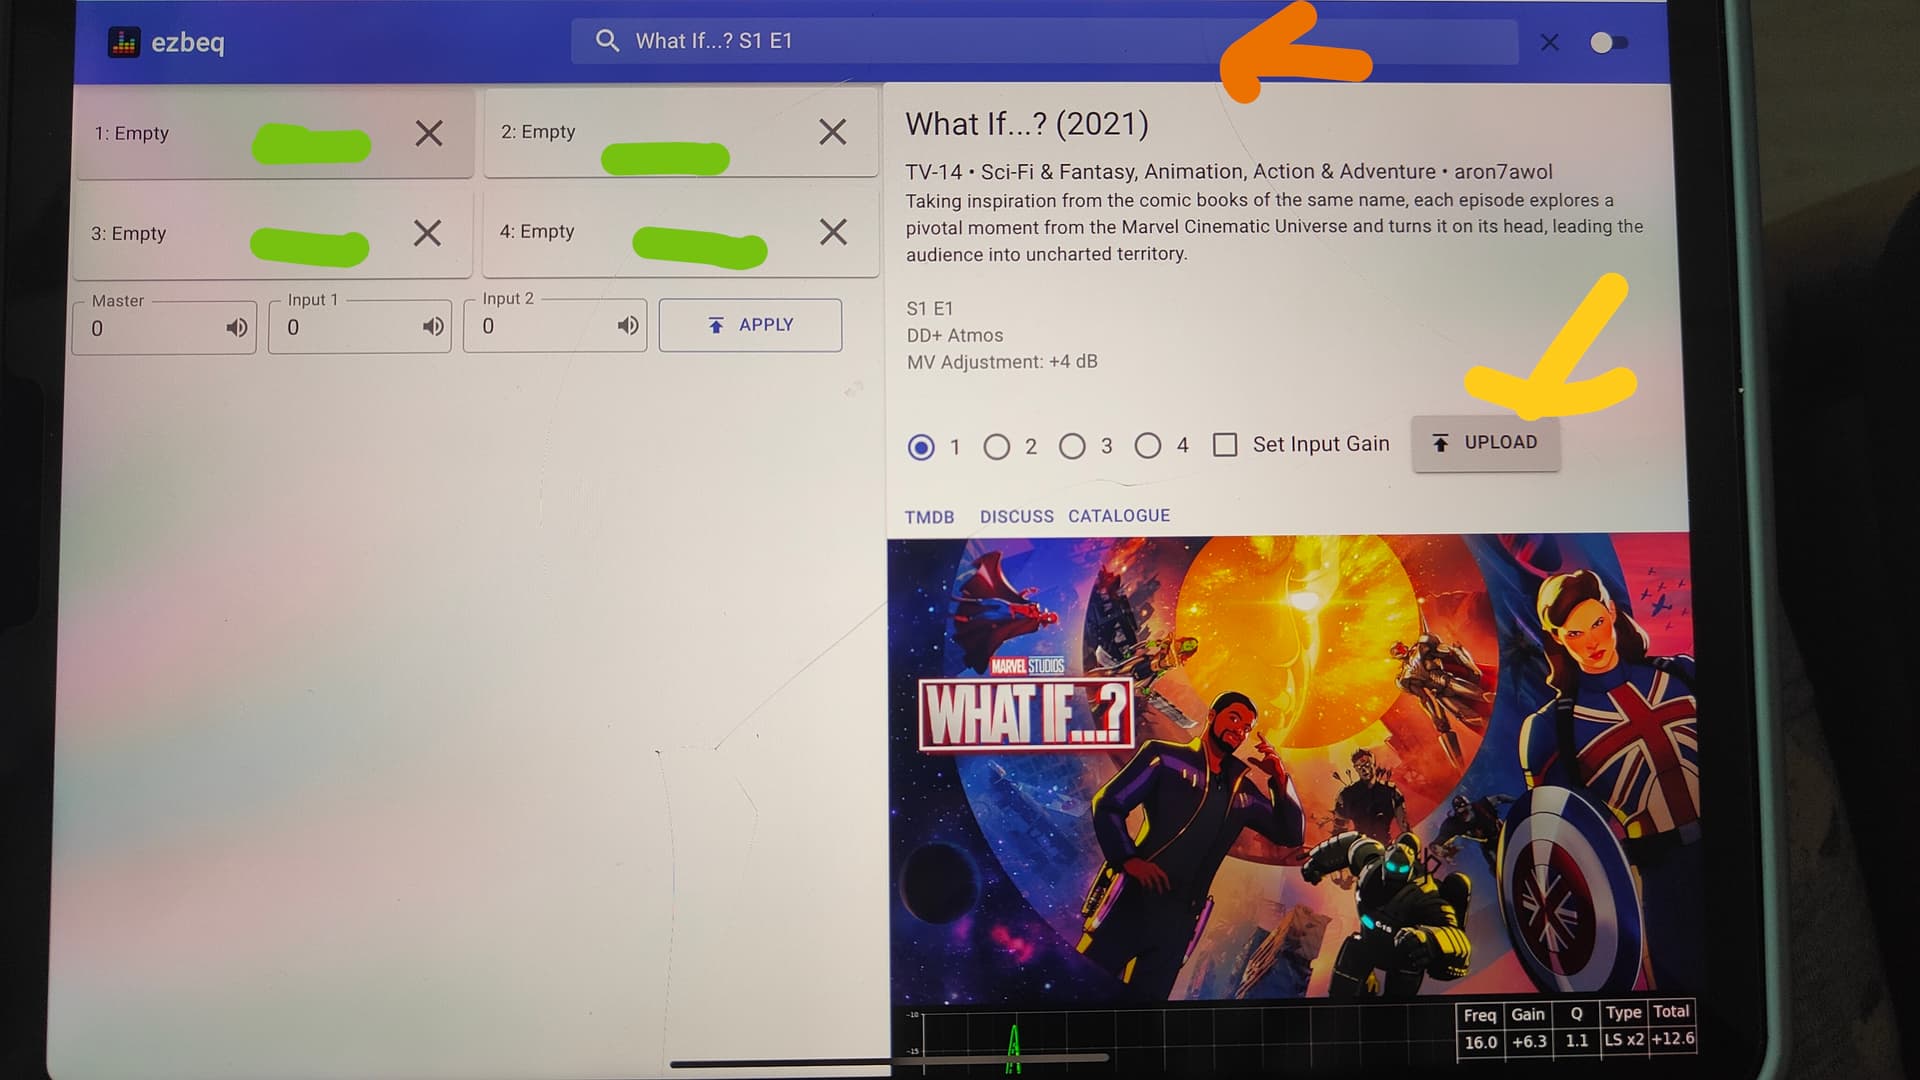
The orange arrow is where you will search for the movie, the yellow arrow is where you press to upload the beq to connected minidsp, finally the green line indicate which config slot you would like to load the beq to. (Just like what you see in the plugin)

It will only upload into the input side of the Minidsp and not the output so need not worry that any EQ setting from REW to flat your subs response according to your room will be overwritten.

Using RPi4 method save a lot a lot of time as compared to

  1. Going to ezbeq software
  2. Update to latest movie list
  3. Merge the files all over
  4. Wait… wait and wait for item 2 to finish followed by item 3
  5. Choose the files from Minidsp plugin and load the file into your Minidsp config slot

Those who did the above will know what I’m saying…as compared to

  1. Turn on Pi4
  2. Go to web browser and punch in Pi4 IP address
  3. Search for movie
  4. Load to desired config slot

I’m no programmer but just simply following steps from above link. Trust me it is so much simpler using this now compared to using laptop or remote or WiDg. This is on the fly loading and testing if the movie is better with or without beq. End of the movie just empty the loaded slot and turn off Pi4. Still beats turning on/off Laptop and fire up Minidsp plugin and ezbeq software.

Have fun! :blush:

3 Likes

Great sharing…

1 Like

Awesome !! Thanks for sharing bro ! Great stuff

1 Like

32mins into “Twister” in Dolby Atmos, utilizing all 13 channels (includes all height channels). Sound engineer put effort into this mix indeed!

Look at the sound object moving

Excellent Remaster. Worth the watch!

2 Likes

Ya I just finished watching this as well, really enjoyed the atmos mix!
Wow Is that Trinnov?

1 Like

Yes sir.

After the Atmos version, will catch the Auro3D version see how it fair.

I’m an Auro guy, so I’m placing my bet on the Auro3D. It’s already very impressive in the Atmos. Still watching now :smiley:

Unable to upload video here. Hence linking my YouTube channel :sweat_smile:

Heard good things abt auro 3D on YT but never experienced it before… have you watched daylight in atmos too? How active is the height? It sounds good to me too, especially the scene with the flame rushing over at the top!

I watched daylight remaster in Auro3D not in Atmos yet.

Yes the Auro3D is addictive and personally feels that the sound bubble is more ‘complete’ in a sense due to the VOG. The coverage is complete.

Despite Room Optimizer 3D remapping can also achieve the “phantom VOG” making use of both top middle speaker left and right feel in Atmos, but native Auro still does better in my opinion

You are welcome to drop by to experience Auro3D :blush:

Thing lacking will be the medias. Really limited in SG (in fact can’t be found in SG but to purchase and ship from overseas), but in Germany is a totally different thing. Auro3D is like everywhere.

I’ve got the following in Auro3D
Spiderman
Daylight
Twister
Jumanji
That’s it… And the Auro demo disc vol 2😅

1 Like

Have you tried upmixing regular surround and atmos trackS with auromatic? Watch some German installer on YT saying it works great. I’ll definitely visit when you can host some of us. Definitely wanna experience the power of Trinnov.

Yes I did, I will upmix 7.1 to either Dolby Surround Upmix, Auromatic or NeuralX. DSU will utilize the Atmos format layout, Auromatic will utilize front, rear height, center top front and VOG. I’m more incline with NeuralX if movie is DTS by nature as NeuralX will utilize all of 8 heights.

I’ll be more than happy to host. Perhaps in another 2 to 3 weeks time. Will give you a ping :blush:

Wonderful thanks!

1 Like

You have the disc? Do extract the portion that heighten the dolby atmos effects and if possible include the Auro3D (DTSHD MSTR) as well.

Sure bro.

To share, folks here will be able to find the Atmos and Auro3D clips from the below link. Not many though but good enough to make some comparisons. Let me know if you guys able to download and try it out.

https://drive.google.com/drive/folders/1wQyXCnpWMYSEhT-EznCOH-3Yr27IfrSC?usp=sharing

Atmos is in 13 channels (Top Front, Middle, Rear), likewise for Auro3D also in 13 channels (Front Rear Heights and Center Top Front, as well as utilizing VOG, which is the channel directly perpendicular above your head)

Personally I find Auro3D more engaging due to Center Top Front and VOG. I specifically trigger solo play from these 2 channels to make comparisons and its definitely in native mix.

For the “Hail Storm” clip, can take note of the boat flying towards you. Should be able to tell the difference between the 2 formats. Of course there are a lot more difference you can tell if you watch the full movie. :smiley:

The Clips will be removed in a weeks time to save google drive space. Those who wish to have it after 28 Aug still can PM me :slight_smile:

2 Likes

Thanks for sharing the scenes with everyone here…A good time for me to try it out on my new AVR - Anthem MRX1140 tmr.

Happy to share
Sounds fantastic! So you all set and ready to calibrate tomorrow eh?