
One of my favourite channel. Interesting take on the number of measuring points and the usage of tripod.
One of my favourite channel. Interesting take on the number of measuring points and the usage of tripod.
Yup. Saw the video as well but I don’t agree with some points he mentioned when doing the Audysset calibration setup. This video seems quite sloppily done. I expect something more enriching from him. But I guess it’s one of those days where he just simply wanted to roll out clip (as promised 8 mtgs ago). Fee the heat from his subscribers I guess.
Lol this guy again…
For those interested to get the app to improve the Audyssey experience, I have in the past, posted a simple guide on how to do it in xtremeplace forum. I’m going to reproduce here.
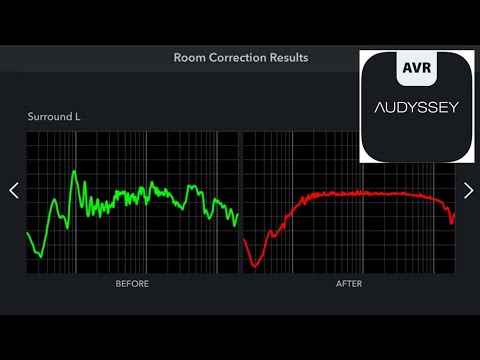
Audyssey did a rather good job in “flattening” the frequency response from 10Hz all the way to 20,000Hz. Many did not realize that our speakers and subwoofers “interacts with our room” in ways that we may not realize. For instance, you may come across some AV articles that mentioned “room gain” which comes about when sound waves travels and bounce around within the confines of our listening area. Sometimes this so-called “room gains” is needed to in order to “preserve” that “chest slamming” bass that we seek while other times it can also work against us if we fail to “tame” it - i.e. the undesirable effects of boomy and bloasted bass in the frequency range that we wish we can avoid. This is where most EQ in the likes of Audyssey, YPAO, Anthem ARC Genesis etc comes in to eliminate those side-effects of poor room mode. In short, room gain can be an allied to us if we perform Audyssey EQ calibration correctly.
In order for us to get a “custom house curve” that fits our “room mode”, the pre-requisites are to get your speakers and subwoofer placement correct and then perform a proper Audyssey calibration. One misconception - One cannot simply raise the subwoofers by a few dBs and hope to get that “chest-slamming” bass kick. As mentioned in my earlier posts, there are 2 ways to create custom house curves - one way is to get an external DSP like miniDSP which worked in tandem with Room EQ Wizard (REW) but it involves some learning curve to know how to use it. The other way which is much easier is the use of an app called “Audyssey MultEQ Editor” which is available for both iOS and Android users. Besides allowing users to perform Audyssey calibration by syncing the results with the AVR connected via our home Wi-Fi network, it also allows the users to make finer adjustments to the frequency curve (via Curve Editor feature found within the app itself), turn on/off the Mid-Range Compensation (MRC) or even dictates the frequency range for Audyssey EQ filters to be applied. Some speakers tends to perform better with music when there is no EQ filters being applied to a certain frequency range. Some purists even believe that the max frequency range for Audyssey EQ filters to be applied should fall somewhere within the Schroeder frequency which usually falls between 100Hz and 300Hz. In my opinion, a good starting point will be somewhere between 500Hz and 5,000Hz (ARC recommendation).
Of late, I discovered a nifty utility (not perfect though as the creator has no time to iron out some of the kinks but for the most part, the “key” features work so let’s cut him some slack  ) called Ratbuddyssey which can be downloaded from here: Release graphing release (fixed) · ratbuddy/ratbuddyssey · GitHub. This little utility albeit “buggy” is a god-send imo. It allows us to make finer changes and adjustments on the original Audyssey calibration file (.ady) and then import back to the Audyssey MultEQ Editor App to be uploaded to our AVR. If you ask anyone what is the biggest gripe using the Audyssey MultEQ Editor App; most will say the App itself requires a larger screen estate like on a tablet to allow them to “see” and make changes to the frequency curve and even then, it is STILL hard to make some changes with precision using just our fingers or even a stylus. This is a real PITA if you ask me!
The Ratbuddyssey utility paired with Audyssey MultEQ Editor App certainly makes life a little easier for me these days since I can implement and test drive all variations of house curves within matters of minutes and that’s what makes it such a joy to use.
Enough said, let’s dive into the tutorial on how to setup a custom house curve using just the Audyssey MultEQ Editor App without the need for miniDSP (assumption made that you have already achieved a somewhat reasonably good frequency curve for your subwoofers AFTER Audyssey calibration and for that I meant you are able to get a reasonably “flat” response curve from 10Hz to 120Hz thereabouts.
Let’s say that we want to boost the modal frequency range (say 20Hz – 50Hz) by +3db for our 2 subwoofer(s). The first thing you need to do is export the Audyssey calibration file (.ady) over to our laptop so that we can use the Ratbuddyssey utility to make finer adjustments to the curve. This is the preferred method over the use of the Curve Editor feature found in the Audyssey MultEQ Editor App. Although you can still use the Curve Editor feature found within the Audyssey MultEQ Editor App to create your custom house curve and it will still work…but you will probably get a headache trying to get the “boost” at the desired frequency center. So do yourself a favor by downloading the Ratduddyssey utility to your laptop/desktop PC before you read on…
How to export the (.ady) file? Simple, use the “Move to” function on the Audyssey MultEQ Editor App and then select the desired (.ady) file and then hit “Send a Copy”. You will see the option that says, “Copy to Drive” as in Google Drive. The (.ady) will now be exported from the App and into your Google Drive folder.

Next, go to your laptop/desktop PC and open up a new session on the Ratbuddyssey. Select “File” then “Open” to select the (.ady) file in your Google Drive folder.
Once opened, you will see the interface will be populated with all your associated speakers and subwoofers which resides at the left pane of the utility.
Next, uncheck the DynamicEQ (DEQ) checkbox. Ensure that the Audyssey Curve Type is set to “Flat” (default) instead of “Reference”. An optional setting like MRC (Mid-Range Compensation) can be turned off easily just by unchecking the check box and it will apply to all speakers. Make sure the Custom Speaker Type is set to “Small” for all the speakers (FL,C,FR, SLA,SRA,SBL,SBR etc) and the subwoofer(s) set to “Subwoofer”.
Next, set your Frequency Cut-off range for speakers (Only) to anything between 500Hz and 5,000Hz. I will advise the user to set it at 500Hz as a good starting point and slowly work your way up until you find a good “blend” where your Mains and the subwoofer(s) complements each other in a constructive manner. This is where the crossover points come in. To optimize your Mains crossover to the Subwoofer(s), you can use REW and Umik 1 to help you find the best crossover points (I will not be touching on this in details but I will share what I meant if there is enough interest being generated). Let’s just say that you decide to crossover your Mains at 80Hz (THX Fixed) so anything below 80Hz will go to the subwoofer(s) while anything above 80Hz will go to the Mains. As for subwoofer(s), make sure you restrict the Frequency Cut-off to either 200/250Hz.
The rest of the options remain intact…any changes like increasing the crossover and trim levels can be performed at the App level since it is much easier and intuitive. We mainly used Ratbuddyssey to allow us to make finer adjustments to our curve setting.
Now comes the important bit – i.e. boosting the level (SPL) by +3db (as an example). More often than not, the so-called “mid-bass punch” or “chest-slam” usually falls anywhere between 20Hz and 70Hz. Depending on your crossovers between the Mains and the subwoofer(s) which is usually 80Hz for most bookshelf/tower speakers as well as its corresponding SPL levels, somewhere between 65Hz to 70Hz, we will start to see some roll-off if we set our crossovers to the ubiquitous 80Hz. Hence the safest region to implement a boost IMO will be somewhere between 20Hz and 60Hz. There is no right or wrong answer here, simply experiment it to hear for yourself which suits you better in your listening area. The keyword here is “your listening area”, not mine due to the difference in “room gain”.
In my room, I find 20Hz – 50Hz at a 3-4db boost to suit me the best in my listening environment (a typical 4 x 4 room layout). I can increase up to +6db if I truly want to feel more punch with a higher level (SPL). Sometimes, there is no need for you to go all the way to +6db boost if your subwoofer(s) is capable of outputting high levels (SPL) at a low-frequency range. So know your subwoofer’s capability and experiment it for yourself.
How to add the boost to the various frequency range for the subwoofer(s)? For this, you will go to the Target Curve Points panel located just below the Channels panel. Type in the following:
Frequency Center/Boost:
20Hz at +3db
50Hz at +3db
170Hz at 0db
What this does to your target curve can only be viewed after you have exported the modified (.ady) with the custom “house curve” back to the Audyssey MultEQ Editor App. Before we do that, we still need to apply the same amount of boost to the same set of frequency centers (20Hz, 50Hz, 170Hz & 400Hz) for the Mains like so:
Frequency Center/Boost:
20Hz at +3db
50Hz at +3db
170Hz at 0db
400Hz at 0db (assuming we set our Frequency Cut-off range at 500Hz)
Hold on, we are not done yet! Often overlooked by many users is to apply the same amount of boost to the subwoofer trim levels. The reason for that is because of the way the Audyssey MultEQ Editor App works. Let me explain as best as I could here…
When we boost the subwoofer(s) by +3db for frequency range from 20Hz and 50Hz, the Audyssey target curve will do a “self-course correction” by lowering the entire curve by the same amount of boost you applied. Why is this so? The reason behind this is simple. Audyssey is trying to ensure that the overall SPL level for the subwoofer(s) and the rest of the speaker arrays will “sound” the same at a given volume level. In so doing, whatever boost we have applied to the subwoofer(s) will not be translated to the “actual” results since there the boost to the target curve has been “pushed down” (becomes a cut) by Audyssey. In order to overcome this, we have to apply the same amount of boost (in the is case +3db) to the trim levels of our subwoofer(s). So how do we do it? You can either do it at the App level or within the Ratbuddyssey itself. For the latter route, add +3db under the “Custom Level” text field. DO NOT simply at +3db and call it a day. Instead, you will need to add +3db to the original SW level.
For instance, if the initial trim level for your 2 subwoofers as follows:
Subwoofer 1 (SWMIX): -1.0
Subwoofer 2 (SWMIX): -2.0
You will need to add “+3db” to the original trim value which will give you:
Subwoofer 1 (SWMIX): +2.0
Subwoofer 2 (SWMIX): +1.0
That’s it! You are done! Click on “File” and “Save As” and give it a meaningful filename like Audy_DDMMYY_boost3db_DEQ_off.ady (as an example).
Next, export the modified (.ady) file – i.e. Audy_DDMMYY_boost3db_DEQ_off.ady to the same Google Drive folder.
Once the export is completed. Do the following:
Select the “…” icon to the right of the file
Select the “open in” option; it will prepare to export the file
Swipe to the right and Select “More”
Select the “Copy to MultEQ” option
The Audyssey MultEQ Editor App will automatically be launched and append the new (.ady) calibration file – i.e. Audy_DDMMYY_boost3db_DEQ_off.ady into the main screen
[skip this step] if you have already add the boost amount on Ratbuddyssey…
If you have not yet added the boost of +3.0db to the trim levels for your subwoofer(s), now is the time to do so by going over to “Speaker Detection Results” option and go to the second tab that allows you to change the Levels (SPL) settings to reflect the same:
Subwoofer 1 (SWMIX): +2.0
Subwoofer 2 (SWMIX): +1.0
Once that is done, import the new modified (.ady) calibration file over to the AVR. You are done!
What’s next?
Play some familiar 2 channel music…set the Sound Mode to “Stereo” or “Direct” and then “Pure Direct” (cut off subwoofers and set the Mains to LARGE), feel and hear the difference that your Mains (after adding a +3db boost to the modal frequency range – i.e. 20Hz and 50Hz), you should “feel” and hear a much more impactful low extension coming from your Mains (especially for those who have a pair of tower-sized speakers or bookshelf speakers that can go down to 40Hz and below).
After the 2 channel test, you can put in a movie like the Opening scene of Edge of Tomorrow or the famous True Legend fight scene that I know many XP members adore…Hear the difference and I can almost guarantee you that you will hear a significant difference in the low-frequency extension that DEQ cannot provide.
Take your time to slowly digest it…Post any questions if you have any.
Additional Tips:
2.DO NOT remove the original Audyssey calibration file…
3.Do A/B comparison between “flat” Audyssey Reference Target Curve and the new custom “Reference Target House Curve”. This will allow for a more objective assessment.
Thanks, desray.
Is it possible to “pin” this?
Done. It is pinned under Home Theater Lobby - Home Theater Lobby - AV Discourse Community Forum (SG)


Interesting take on the midrange compensation @ around 47mins
Hmmm, the height of the mic are also varied at different positions. By the way, did a quick comparison and there is no way I will turn on the midrange compensation.
Yes, turn it off. This is an antiquated audio concept that is no longer applicable to modern speakers. Speakers these days are capable to sustain a flat curve from 2KHz till 20KHz.
But for that to happen, the app is required as the MRC is turned on by default after every Audyssey calibration. Audyssey should start to turn this MRC off by default.
I may consider doing a workshop at my place on how to use Audyssey Editor App alongside the Ratbuddyssey utility to get the best out of your Audyssey setup. This will only happen when the nation's vaccination drive reached at least two-thirds "fully" (2 doses) vaccinated. I think this is a much safer approach imo...
Note: The above will depends on when my Anthem MRX AVR is coming…
Apparently this workshop will no longer happen. COVID cases still on the rise after govt decided to embark our journey towards endemic way of life and of course I no longer have my Denon X8500H with me.
Any idea if calibration without app, but set to Flat instead of Reference will disable the midrange dip?
Don’t think it will remove the MR dip that thru FLAT
Answer is no. You will need the App to do that. For Audyssey to work properly after calibration, you will need to use Reference, not Flat.
Hi Everyone,
I’ve created a Web version of ratbuddyssey app with most of it functionality and no installation required. You are welcome to check it out: https://audyssey.pages.dev